

Easy Homemade Sausage Balls Without Bisquick: The Ultimate Party & Brunch Appetizer
Savory, irresistibly cheesy, and incredibly simple to prepare, these Homemade Sausage Balls are a universal crowd-pleaser. Forget the boxed mix; this recipe comes together quickly with basic pantry ingredients and boasts excellent freezer-friendliness, making them ideal for last-minute entertaining, a delightful holiday brunch, or any gathering where delicious, bite-sized snacks are appreciated. Prepare to impress your guests with these flavorful, melt-in-your-mouth sausage balls!

Why You’ll Love This Homemade Sausage Ball Recipe
There are countless reasons why these homemade sausage balls will quickly become a cherished staple in your recipe collection:
- Effortlessly Delicious: Despite being made entirely from scratch, the preparation is surprisingly straightforward. You’ll achieve maximum flavor impact with minimal fuss.
- No Bisquick Needed: You won’t miss the convenience of store-bought biscuit mix. Our simple homemade biscuit-style base delivers a wonderfully tender texture and allows you complete control over the ingredients.
- Crowd-Pleasing Flavor: The harmonious combination of savory ground pork, sharp cheddar cheese, and a hint of seasoning creates an utterly addictive flavor profile that appeals to palates of all ages.
- Versatile Serving: These delectable bites are incredibly versatile. They shine as an irresistible appetizer, make a hearty addition to any breakfast or brunch spread, and are perfect as a satisfying game-day snack.
- Freezer-Friendly: Streamline your meal prep by making a large batch and freezing them. They’re perfect for convenient future meals, unexpected guests, or a quick snack.
- Easily Customizable: The recipe is highly adaptable. Feel free to adjust the flavors to suit your preferences, whether you desire more spice, a different type of cheese, or fresh herbs.
Expert Tips for Perfect Homemade Sausage Balls Every Time
Achieving the absolute best homemade sausage balls is simpler than you might imagine. Pay close attention to these expert tips, as these small details truly make a significant difference in the final taste and texture of your savory bites:
- Choose the Right Sausage: For optimal flavor, opt for a plain, bulk ground pork sausage. While delicious in other contexts, avoid heavily flavored varieties like Italian sausage (which has strong herbal notes) or specialized breakfast sausage (often sweetened or highly seasoned). The goal here is to let the rich, cheesy, savory goodness of the sausage ball itself truly shine, without competing with overpowering external flavors. Brands like Jimmy Dean’s regular pork sausage are excellent and readily available choices.
- Bring Sausage to Room Temperature: This is a simple yet incredibly crucial step that many overlook. Allow your ground sausage to sit out at room temperature for approximately 20-30 minutes before you begin mixing. Cold sausage is much stiffer and significantly harder to incorporate evenly into the flour and cheese mixture. Trying to mix cold sausage often leads to overworking the meat, which can develop gluten in the flour and result in tough, dense sausage balls rather than light, tender, and melt-in-your-mouth ones.
- Freshly Grate the Cheddar: While convenient, pre-shredded cheese found in bags is typically coated with anti-caking agents such as cellulose or potato starch. These agents can prevent the cheese from melting properly and, more importantly for this recipe, can introduce excess dry starch into your mixture, leading to dry or crumbly sausage balls. Freshly grated sharp cheddar, on the other hand, melts beautifully and integrates seamlessly, ensuring a moist, gooey, and perfectly cheesy bite in every sausage ball.
- Use a Medium Cookie Scoop for Uniformity: Consistency in size is paramount for even cooking. A medium cookie scoop (typically holding about 1.5 tablespoons) is your best friend here. It ensures that each sausage ball is precisely the same size, which in turn guarantees that they all cook at the same rate. This prevents the frustration of some balls being undercooked in the center while others are overcooked and dry on the edges.
- Bake on a Wire Rack Over a Rimmed Sheet: This technique is a true game-changer for preventing greasy or soggy bottoms, a common complaint with many sausage ball recipes. As the sausage balls bake, the wire rack elevates them, allowing any excess fat rendered from the sausage to drip away onto the rimmed baking sheet below. This results in beautifully golden-brown, crispy exteriors and a much lighter, more pleasant texture throughout. For super easy cleanup, don’t forget to line your rimmed baking sheet with aluminum foil!
5-Star Reader Review
✪✪✪✪✪ “The sausage balls are such an easy recipe. We had all of the ingredients here at home to make them for our Super Bowl Party. We had some spicy sausage, so the maple syrup was great to drizzle over them. They were definitely a hit!” -Julie
How to Make Homemade Sausage Balls Without Bisquick: A Step-by-Step Guide
You absolutely do not need a box of Bisquick to create incredibly delicious and perfectly textured sausage balls. This recipe simplifies the process, making it easy to achieve perfect, flavorful results entirely from scratch. Follow these detailed steps for a truly homemade experience that tastes far superior to any mix.
Step One: Prepare Your Homemade Biscuit-Style Dry Mix
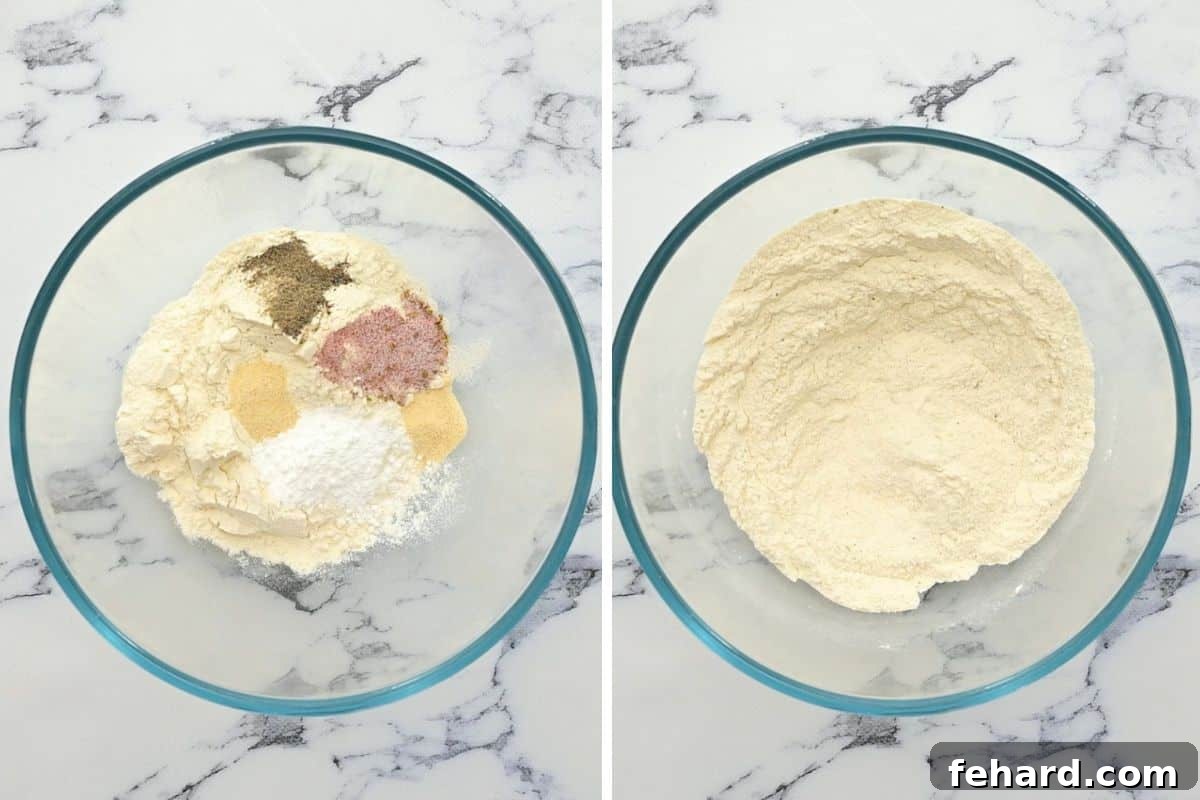
Creating a homemade substitute for Bisquick is surprisingly simple and ensures you know exactly what clean, wholesome ingredients go into your sausage balls. In a large mixing bowl, combine the all-purpose flour, baking powder, a pinch of black pepper, garlic powder, onion powder, and your favorite seasoned salt. Whisk these dry ingredients thoroughly until they are uniformly combined and no lumps remain. This precisely seasoned blend will form the flavorful, leavening base for your tender sausage balls. Yes, it really is THAT easy to create your own effective and delicious mix!
Step Two: Add Sausage, Cheese, and Milk
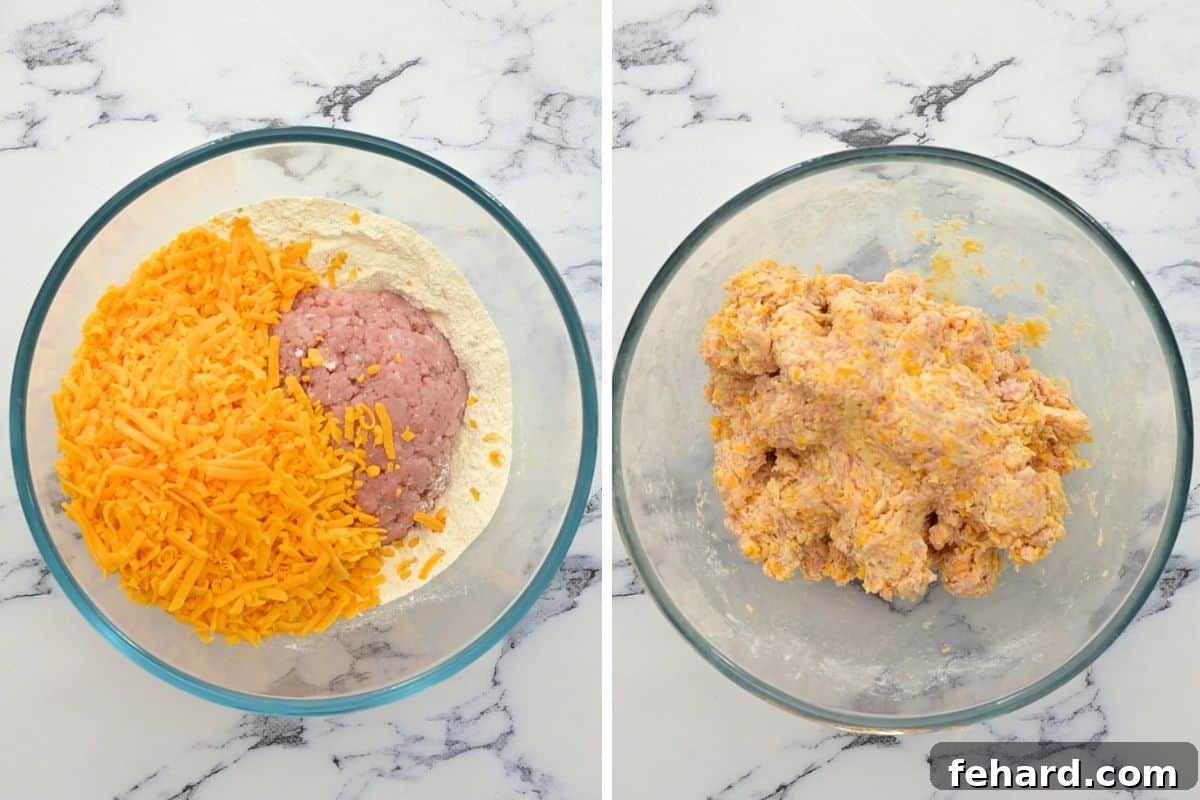
Once your dry mix is perfectly prepared, it’s time to introduce the stars of the show. Crumble the room-temperature ground pork sausage directly into the large mixing bowl with the dry flour mixture. Add the generous portion of freshly grated sharp cheddar cheese and the ¼ cup of milk. Now comes the best and most effective part of the mixing process: use your clean hands to gently combine all the ingredients. Your hands are truly the most effective tool here, allowing you to feel when the mixture is uniformly blended and cohesive without the critical risk of overworking the meat. Mix until everything just comes together and forms a cohesive, pliable dough. If the mixture feels a bit too dry or crumbly to hold its shape, add an additional ½ tablespoon of milk at a time until it reaches the perfect consistency.
Step Three: Portion and Shape Your Sausage Balls
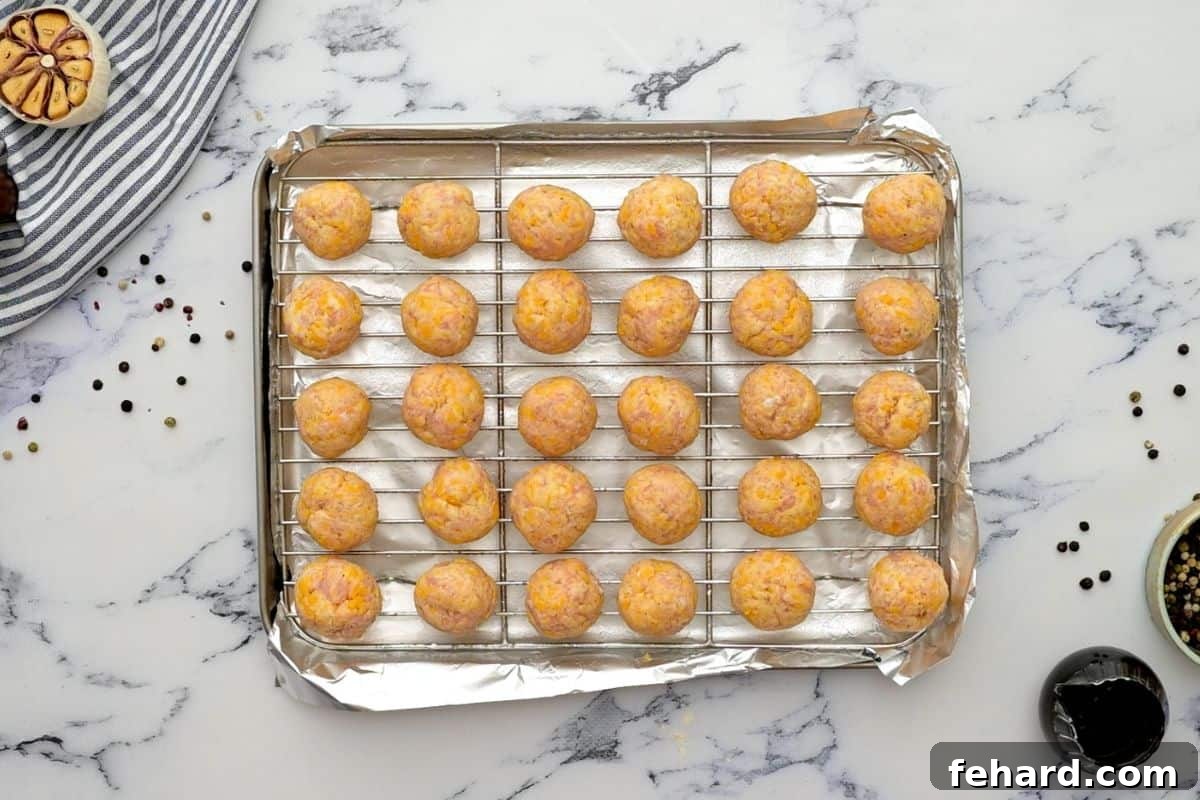
For perfectly sized and uniformly cooked sausage balls, a medium cookie scoop is indispensable for portioning out the mixture. This ensures consistent sizing, which is key for even baking. After scooping each portion, gently roll it between slightly dampened hands to form a smooth, compact ball. The slight dampness on your hands works wonders, helping to prevent the mixture from sticking and making the rolling process much easier and cleaner. Once shaped, carefully place each sausage ball onto your prepared wire rack, which should be set over a rimmed baking sheet, leaving a small amount of space between each one to allow for proper airflow and even browning.
Step Four: Bake to Golden Perfection and Serve
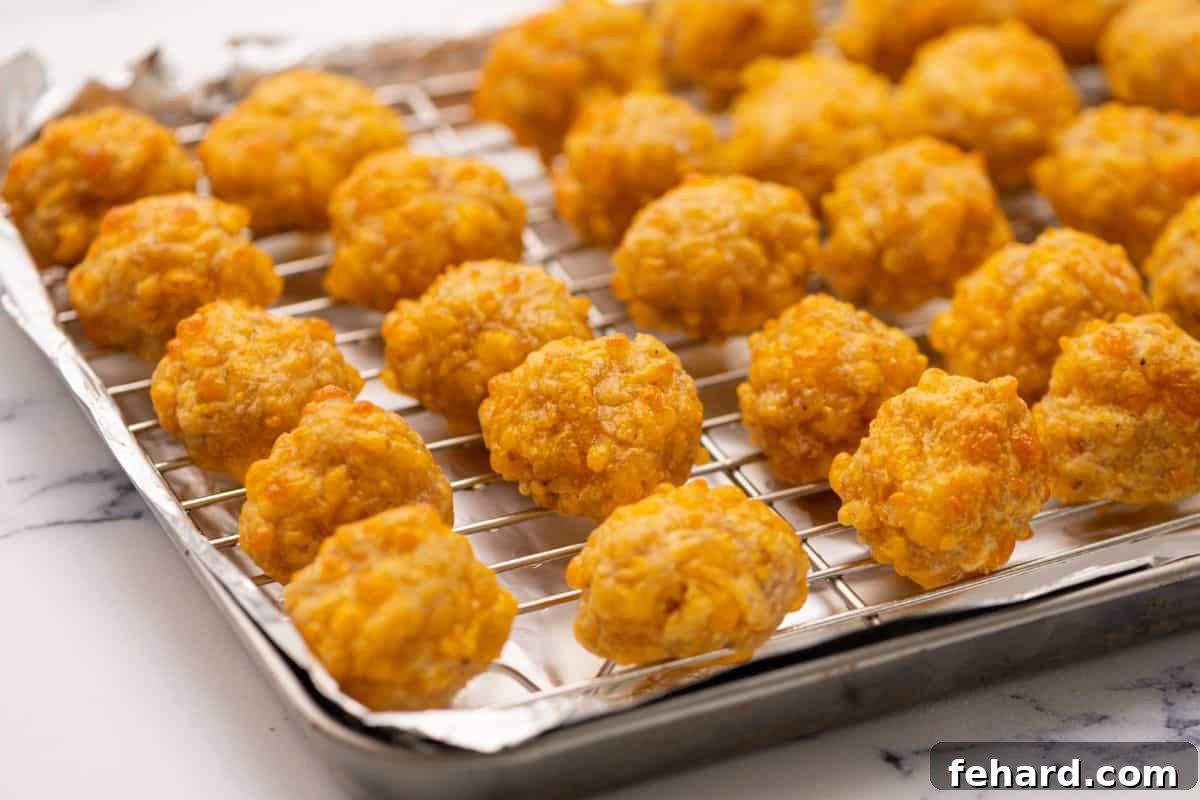
Carefully transfer the baking sheet, with the shaped sausage balls on the wire rack, to your preheated oven. Bake for approximately 18-22 minutes, or until the sausage balls are beautifully golden brown on the outside and thoroughly cooked through to the center. To ensure they are perfectly safe to eat, their internal temperature should register at least 165°F (74°C) when checked with an instant-read thermometer. Once baked, remove them from the oven and let them cool slightly on the rack for a few minutes before serving. This brief cooling period allows them to firm up slightly and cool enough to handle comfortably.
Don’t Forget the Dipping Sauce! While utterly delicious on their own, these savory sausage balls are taken to the next level when served with a complementary dipping sauce. Classic choices include warm maple syrup (for a delightful sweet and savory contrast), zesty spicy brown mustard, rich and creamy queso, tangy sweet chili sauce, smoky BBQ sauce, cool and herbaceous ranch dressing, or the trendy, exciting kick of hot honey. Offer a variety to let everyone choose their favorite flavor pairing!
Recipe Modifications & Variations to Try
One of the many wonderful things about this homemade sausage ball recipe is its incredible adaptability. Feel free to get creative and customize them to perfectly suit your taste preferences, dietary needs, or whatever ingredients you have on hand:
- Gluten-Free Version: Making these delicious sausage balls gluten-free is surprisingly simple! First, always ensure that the bulk ground sausage you choose is certified gluten-free (most plain varieties are, but a quick check of the label is always recommended). Then, simply substitute the all-purpose flour with a high-quality 1:1 gluten-free all-purpose flour blend. The rest of the recipe remains exactly the same, delivering equally delicious and satisfying results that everyone can enjoy.
- Using a Boxed Biscuit Mix (Bisquick): If you truly prefer the ultimate convenience of a ready-made mix, you can certainly use it. Simply replace the 2 cups of all-purpose flour, 1 tablespoon of baking powder, and 1 teaspoon of seasoned salt with 2 cups of your favorite boxed biscuit mix (such as Bisquick). This makes the preparation process even faster, though our from-scratch version is already remarkably quick and easy!
- Lower-Fat Option: For a lighter take on these savory bites, opt for skim milk instead of whole milk, and choose your favorite bulk chicken or turkey sausage in place of pork sausage. Keep in mind that using leaner meats might result in a slightly drier sausage ball, as the fat content contributes significantly to moisture and richness. However, they will still be incredibly flavorful and a fantastic healthier alternative.
- Spice It Up!: If you absolutely love a bit of heat, there are several exciting ways to add a delicious kick. Incorporate a pinch (or up to ½ teaspoon for a more significant heat level) of cayenne pepper directly into your flour mixture for an even distribution of spice throughout each ball. Alternatively, for a cheesy heat, replace 1 cup of the shredded cheddar cheese with an equal amount of freshly shredded pepper jack cheese. The mild, zesty spice from the pepper jack adds a fantastic dimension to the overall flavor.
- Herbaceous Twist: For an aromatic boost and a fresh flavor profile, add 1-2 tablespoons of finely chopped fresh herbs such as parsley, chives, or thyme to the sausage and cheese mixture. Rosemary or sage can also be wonderful, especially with pork sausage.
- Different Cheeses: Don’t be afraid to experiment with other melty cheeses to explore different flavor profiles. Monterey Jack, Colby, Gruyère, or even a pre-made cheddar-jack blend can offer delightful variations.
- Smoky Flavor: A small amount of smoked paprika (about ½ teaspoon) added to the dry mix can impart a wonderful smoky depth.
Make-Ahead & Freezing Instructions
These homemade sausage balls are a true lifesaver for busy hosts, impromptu gatherings, and hectic holiday mornings. Their excellent make-ahead and freezer-friendly qualities mean you can easily prepare them well in advance, significantly reducing stress and ensuring you always have a delicious snack, appetizer, or breakfast item readily on hand. They are truly a make-ahead recipe perfect for holiday mornings or effortless entertaining.
- Prepare Up to 24 Hours in Advance (Refrigerated): You can fully assemble the sausage balls, right up to the point of baking. Once shaped, carefully arrange them in a single layer or in an airtight container, separating any stacked layers with sheets of parchment paper to prevent sticking. Store them securely in the refrigerator for up to 24 hours. When you’re ready to serve, simply bake them as directed in the main recipe instructions, potentially adding a minute or two to the baking time if they are quite cold.
- Freezing Unbaked Sausage Balls (Up to 3 Months): To freeze them for longer-term storage, prepare the sausage balls as directed in the recipe, shaping them into uniform balls. Place the raw sausage balls in a single layer on a baking sheet lined with parchment paper. Transfer the entire tray to the freezer and flash freeze them for 1-2 hours, or until they are completely solid. This crucial step prevents them from sticking together in the storage bag. Once frozen solid, transfer the sausage balls to a heavy-duty freezer-safe bag or an airtight container. They can be stored in the freezer for up to 3 months for optimal freshness.
- Baking From Frozen: When you’re ready to enjoy your delicious frozen sausage balls, there’s absolutely no need to thaw them beforehand! Preheat your oven to 350℉ (175℃). Arrange the frozen sausage balls in a single layer on a prepared wire rack over a rimmed baking sheet (as per step 2 of the main recipe instructions). Bake for approximately 28-32 minutes, or until they are beautifully golden brown, thoroughly cooked through, and reach an internal temperature of 165°F (74°C). Baking from frozen will naturally take slightly longer than baking fresh.
Frequently Asked Questions About Homemade Sausage Balls
- Can I use turkey or chicken sausage instead of pork?
- Yes, you absolutely can! While the recipe traditionally calls for pork sausage, both ground turkey and ground chicken sausage work wonderfully as substitutes. Just make sure to use a “bulk” or plain variety rather than pre-seasoned Italian or breakfast sausage to ensure the classic cheesy, savory flavor profile shines through. Keep in mind that leaner meats like turkey or chicken may result in a slightly less moist ball, as fat contributes significantly to juiciness, but they will still be incredibly delicious.
- My sausage balls came out dry or crumbly. What might have gone wrong?
- Several factors can lead to dry or crumbly sausage balls. The most common culprits include: using pre-shredded cheese (the anti-caking agents can dry out the mixture and prevent proper melting), overworking the meat when mixing (this develops gluten in the flour, leading to a tough texture), or simply not having enough moisture in the dough. If your mixture feels too dry or won’t hold its shape, add additional milk, ½ tablespoon at a time, until it’s just pliable enough to roll without crumbling. Ensure your sausage is at room temperature before mixing to help with even incorporation.
- How can I make these sausage balls spicier?
- Absolutely! To add a delicious kick of heat, you have a couple of great options. You can mix ¼ to ½ teaspoon of cayenne pepper into the dry flour mixture for an even distribution of spice. Alternatively, for a cheesy heat, substitute 1 cup of the cheddar cheese with an equal amount of freshly shredded pepper jack cheese. You could also seek out a spicier bulk sausage if your local grocery store offers one.
- What’s the best way to store leftover sausage balls?
- Allow any leftover sausage balls to cool completely to room temperature. Then, store them in an airtight container in the refrigerator for 3-4 days. To reheat them, you can warm them in a 350℉ (175℃) oven for approximately 10-12 minutes, or until thoroughly heated through, for the best texture. They can also be quickly reheated in the microwave, though the oven will give them a crisper exterior.
- What are the best dipping sauces to serve with these?
- The possibilities for dipping sauces are truly endless and part of the fun! Classic warm maple syrup offers a fantastic sweet and savory contrast that many adore. Other popular options include tangy honey mustard, robust spicy brown mustard, creamy ranch dressing, vibrant sweet chili sauce, smoky BBQ sauce, or even a warm, gooey cheese dip like queso. Don’t be afraid to experiment and offer a few choices to your guests!
More Party-Perfect Appetizer Recipes You’ll Love
If you’re planning a party, brunch, or simply looking for more easy and delicious appetizers to expand your culinary repertoire, consider these other fantastic options that are always a hit:
- Sausage Stuffed Mushrooms: Another savory, sausage-filled delight, perfect for elegant gatherings or casual entertaining.
- Baked Brie: A sophisticated and surprisingly simple warm cheese appetizer, often served with fruit, crackers, or crusty bread.
- Perfect Deviled Eggs: A timeless classic that always disappears fast at potlucks and parties. Learn the secrets to making them truly perfect.
- Bacon Wrapped Dates: A fantastic combination of sweet, savory, and chewy goodness – these irresistible bites are always a crowd-pleaser!
- Air Fryer Chicken Wings: Achieve perfectly crispy, juicy chicken wings with minimal oil, made easy in your air fryer.
- Tortellini Skewers: Colorful and flavorful skewers featuring tender tortellini, fresh mozzarella, cherry tomatoes, and basil, drizzled with a light vinaigrette.
Recipe: Homemade Sausage Balls Without Bisquick
By: Kristen Chidsey
Yields: Approximately 28 sausage balls
Prep time: 10 minutes
Cook time: 18-22 minutes
Total time: 28-32 minutes

These savory, cheesy homemade sausage balls are incredibly fast to make. Using simple pantry staples, they freeze exceptionally well and are perfect as an irresistible appetizer or a highlight for your next brunch.
Ingredients
- 1 pound ground pork sausage, uncooked (plain, bulk sausage is highly recommended)
- 2 cups all-purpose flour
- 1 tablespoon baking powder
- 1 teaspoon seasoned salt (homemade seasoned salt adds a wonderful depth of flavor)
- ½ teaspoon black pepper
- ½ teaspoon onion powder
- ¼ teaspoon garlic powder
- 3 cups freshly shredded sharp cheddar cheese (avoid pre-shredded cheese for the best melt and texture)
- ¼ cup milk, plus more if needed (any fat percentage of dairy milk, or unsweetened non-dairy milk also works)
- Maple syrup for serving (optional, for a delicious sweet and savory dipping experience)
Instructions
- Prepare Sausage: Allow the ground pork sausage to sit at room temperature for 20-30 minutes. This crucial step ensures the sausage is pliable and mixes easily into the other ingredients, preventing overworking.
- Preheat Oven & Prepare Pan: Preheat your oven to 350°F (175°C). Prepare a rimmed baking sheet by lining it with foil for easy cleanup. Place a wire baking rack onto the lined pan and generously spray the rack with nonstick cooking spray. This setup allows excess grease to drip off, ensuring beautifully crispy sausage balls.
- Make Dry Mix: In a large mixing bowl, whisk together the all-purpose flour, baking powder, seasoned salt, black pepper, onion powder, and garlic powder until all dry ingredients are thoroughly combined and evenly distributed. This creates your homemade biscuit-style base.
- Combine Ingredients: Crumble the room-temperature ground pork sausage into the flour mixture. Add the freshly shredded cheddar cheese and ¼ cup of milk. Using your clean hands, gently combine all the ingredients. Mix until everything just comes together and forms a cohesive, slightly sticky dough. If the mixture appears too dry or crumbly to hold its shape, add additional milk, ½ tablespoon at a time, until the desired pliable consistency is reached. Avoid overmixing to keep the sausage balls tender.
- Portion & Shape: Using a medium cookie scoop (about 1½ tablespoons), portion out the mixture. With slightly dampened hands, gently roll each portion into a smooth, compact ball. The damp hands will prevent the mixture from sticking. Place the shaped sausage balls onto the prepared wire baking rack, ensuring a little space between each one for even cooking.
- Bake: Bake the sausage balls for 18-22 minutes, or until they are beautifully golden brown on the outside and cooked through. An instant-read thermometer inserted into the center of a sausage ball should register at least 165°F (74°C). The exact baking time may vary slightly depending on your oven and the size of your balls.
- Serve: Remove from the oven and let them cool slightly on the rack for a few minutes before serving. Serve warm with maple syrup, honey mustard, BBQ sauce, ranch dressing, or your favorite dipping sauce.
Equipment
- Baking Sheet with Rack (essential for draining fat and achieving crispy exteriors)
- Medium Cookie Scoop (a sturdy one with a comfortable spring-loaded handle is highly recommended for ease and consistency)
- Large Mixing Bowl
- Whisk
- Grater (for fresh cheese)
- Instant-read thermometer (optional, but recommended for ensuring proper doneness)
Recipe Notes & Tips for Success
- Sausage Selection: Always opt for plain, bulk ground sausage for this recipe. Avoid highly seasoned varieties like Italian or breakfast sausage to ensure the classic savory and cheesy flavor profile dominates. Pork, turkey, or chicken sausage all work, but pork generally yields the juiciest and most traditional results.
- Milk Type: Any variety or fat percentage of dairy milk can be used successfully in this recipe. If you prefer a dairy-free option, unsweetened and unflavored non-dairy milk (such as almond or soy milk) will work perfectly well as a substitute.
- Cheese Quality: For the best texture, melt, and overall consistency, it is highly recommended to freshly grate your cheddar cheese from a block. Pre-shredded cheeses typically contain anti-caking agents that can interfere with the mixture’s consistency and make the sausage balls drier or less melty.
- Gluten-Free Adaptation: To make these sausage balls gluten-free, simply substitute the all-purpose flour with a high-quality, reputable 1:1 gluten-free all-purpose flour blend. Always ensure your chosen sausage is also certified gluten-free.
- Storage of Leftovers: Once cooled completely to room temperature, store any leftover sausage balls in an airtight container in the refrigerator for up to 3-4 days. For best results, reheat them in a 350°F (175°C) oven for about 10-12 minutes, or until thoroughly warmed through. They can also be microwaved for quicker reheating, though the oven method will help maintain their crispy exterior.
- Advanced Preparation (Refrigerated): You can assemble the sausage balls up to 24 hours ahead of time. Once shaped, arrange them in an airtight container, ensuring each layer is separated by parchment paper to prevent sticking, and store them in the refrigerator. Bake when you are ready to serve.
- Freezing for Future Enjoyment: Shaped but unbaked sausage balls can be flash-frozen on a parchment-lined tray until solid. Once solid, transfer them to a freezer-safe bag or airtight container for storage in the freezer for up to 3 months. When ready to bake, place them directly from frozen onto a prepared baking sheet and bake at 350°F (175°C) for 28-32 minutes, or until cooked through and golden brown.
Nutrition Information (Approximate Per Serving)
Nutrition information is automatically calculated and should only be used as an approximation. Actual values may vary based on specific ingredients used, portion sizes, and preparation methods.
| Nutritional Information | |
|---|---|
| Calories: | 133 kcal |
| Carbohydrates: | 7 g |
| Protein: | 6 g |
| Fat: | 9 g |
| Saturated Fat: | 4 g |
| Polyunsaturated Fat: | 1 g |
| Monounsaturated Fat: | 3 g |
| Trans Fat: | 0.03 g |
| Cholesterol: | 24 mg |
| Sodium: | 267 mg |
| Potassium: | 107 mg |
| Fiber: | 0.3 g |
| Sugar: | 0.2 g |
| Vitamin A: | 138 IU |
| Vitamin C: | 0.1 mg |
| Calcium: | 110 mg |
| Iron: | 1 mg |
Tried this delicious recipe? We’d absolutely love to see your amazing creations! Please mention @amindfullmom or tag your photos with #amindfullmom on Instagram! Your culinary masterpieces inspire us.
This post was originally published in 2023 and updated in 2025 with additional tips, detailed instructions, and helpful variations to enhance your cooking experience.