
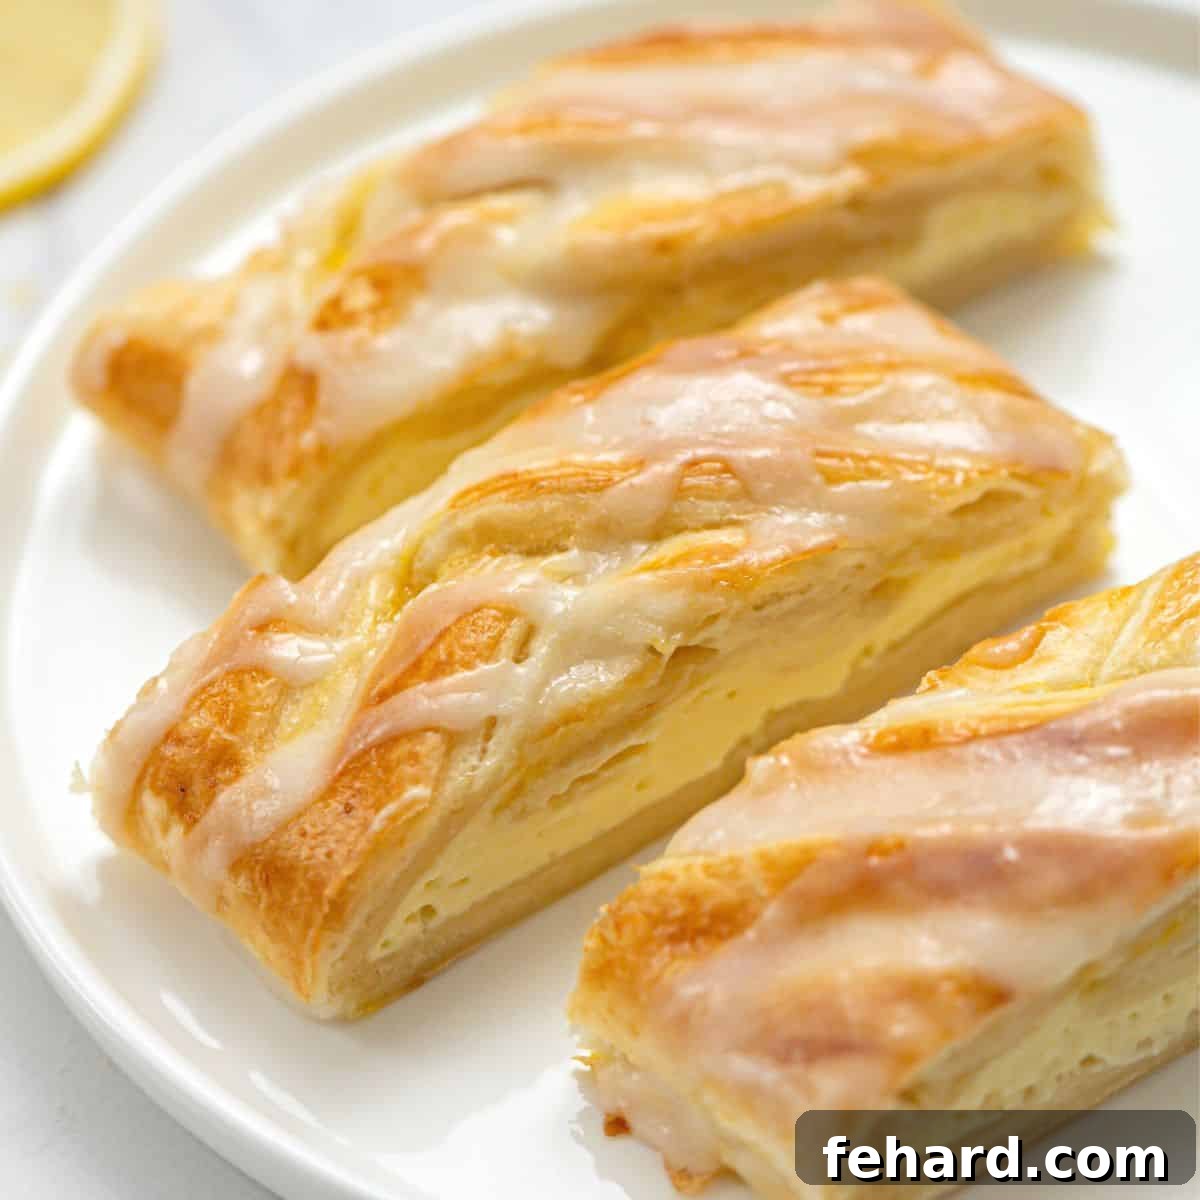
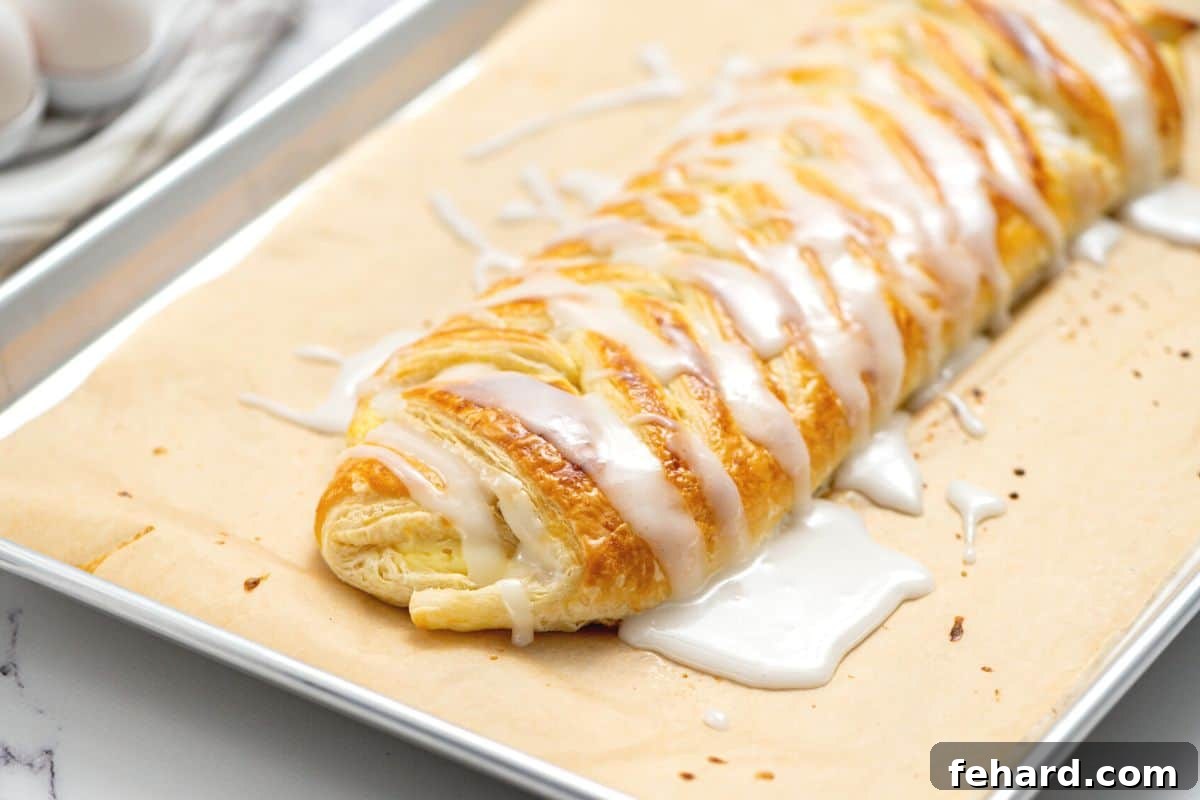
There’s something truly magical about a perfectly baked Cheese Danish. From its golden, impossibly flaky puff pastry exterior to the rich, sweet, and velvety creamy center, all crowned with a vibrant lemon glaze – it’s a pastry that doesn’t just taste good; it makes an unforgettable statement. While a danish might seem like a complex bakery-exclusive treat, this simplified recipe proves you can achieve consistently impressive, show-stopping results right in your own kitchen, with minimal fuss. The secret lies in starting with readily available store-bought puff pastry, a brilliant hack that streamlines the preparation and transforms an otherwise intimidating baking project into an accessible joy. Imagine the comforting aroma filling your home on a peaceful Saturday morning or the delight of serving these elegant pastries at your next holiday brunch. This Homemade Cheese Danish isn’t just a recipe; it’s an invitation to savor moments of delightful indulgence, making every bite feel like a special occasion. Prepare to impress your family and friends with this surprisingly simple yet utterly delicious creation!
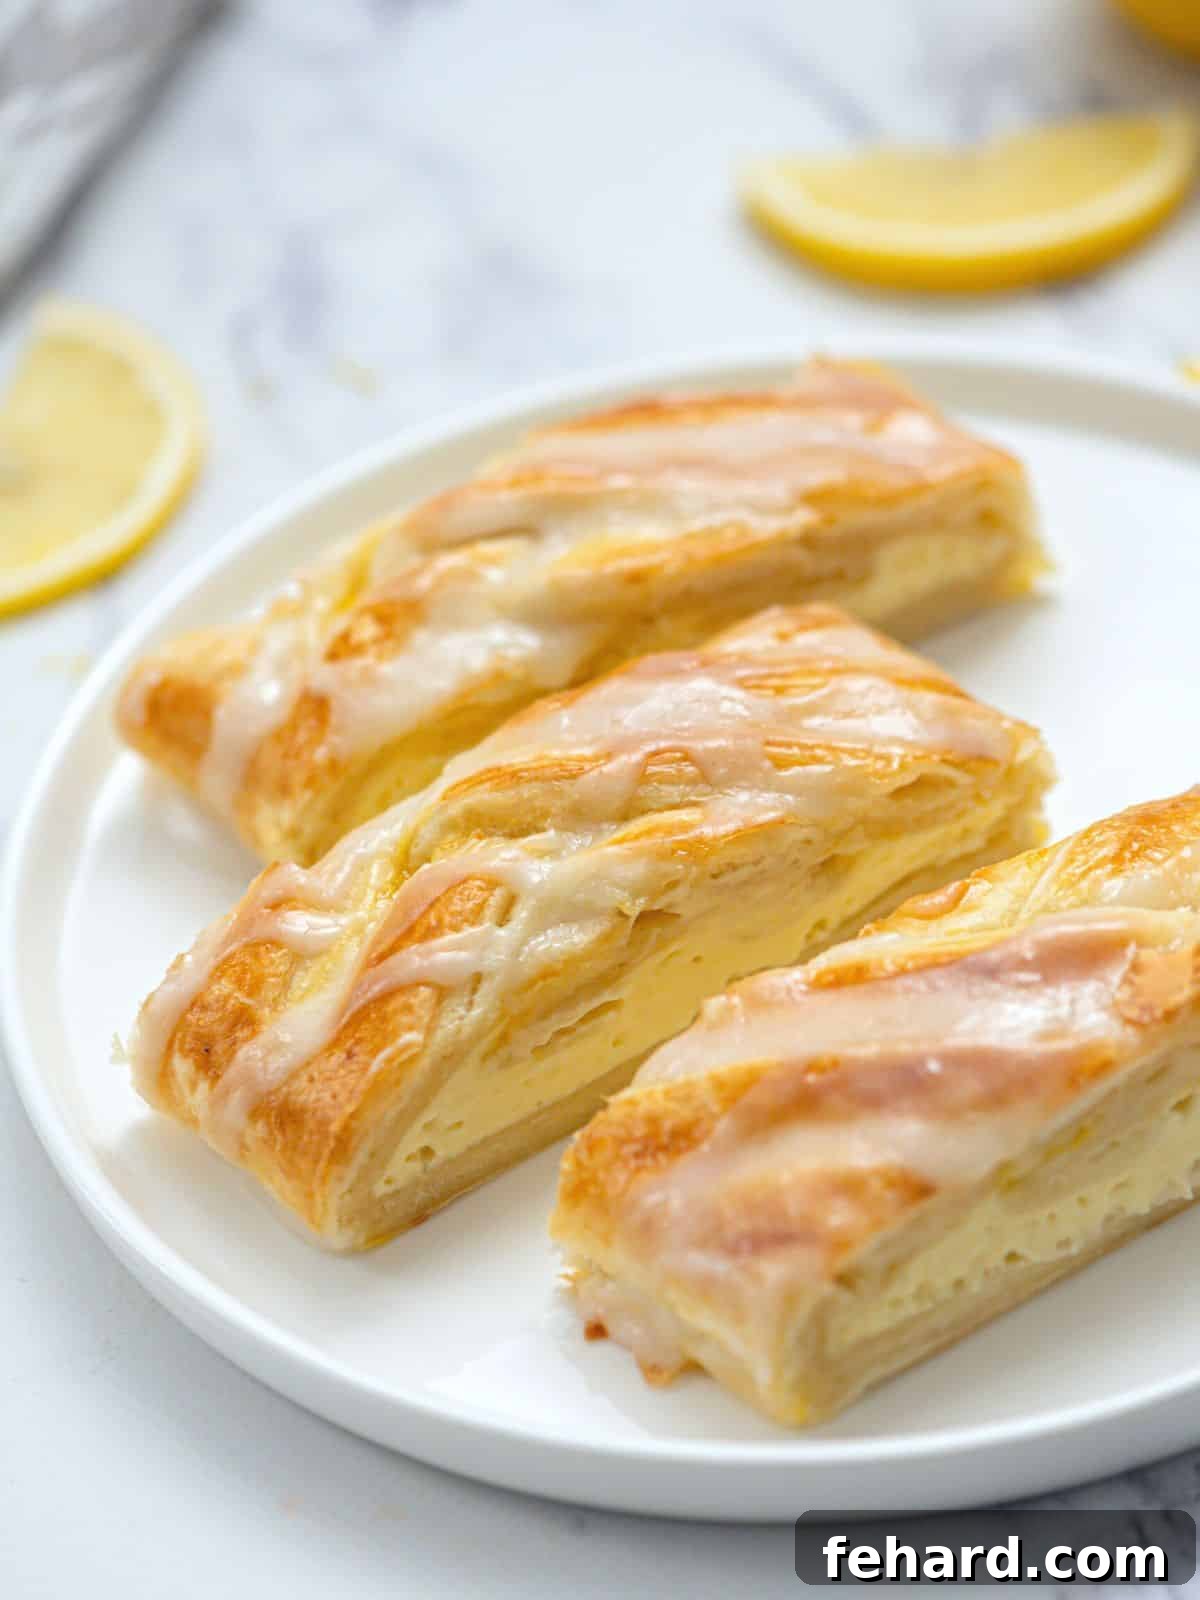
Unlock the Secret to the Ultimate Flaky Cheese Danish: Expert Tips for Success
Crafting the perfect Cheese Danish involves more than just mixing ingredients; it’s about understanding a few crucial techniques that guarantee a perfectly flaky pastry and an irresistibly creamy filling. These simple, yet powerful tips, refined over many batches, will elevate your homemade danish from merely good to absolutely unforgettable. Pay close attention to these insights, and you’ll be rewarded with a pastry that truly rivals your favorite professional bakery.
- Embrace Room-Temperature, Full-Fat Cream Cheese: This isn’t merely a suggestion; it’s an essential foundation for achieving a silky-smooth, lump-free filling. Cold cream cheese will stubbornly resist mixing, inevitably leading to a grainy, uneven texture. Allowing it to soften completely at room temperature ensures it beats beautifully and effortlessly with the other ingredients, creating a luxurious, rich, and perfectly emulsified cream cheese mixture. This optimal consistency holds its shape wonderfully during baking and delivers a truly indulgent center. Furthermore, using full-fat cream cheese is crucial for the best possible flavor and creamy texture.
- Properly Defrost Frozen Puff Pastry Before Assembly: If your puff pastry is tucked away in the freezer, meticulous planning is key! Hasty or improper thawing can lead to a sticky, unworkable dough that’s prone to tearing, or worse, uneven layers that fail to puff correctly. For optimal results, transfer frozen puff pastry to the refrigerator the night before you plan to bake. This slow, gentle thawing process is vital as it preserves the delicate butter layers within the pastry. These layers are the very essence of puff pastry’s signature flaky texture. Never attempt to rush this process in the microwave or at room temperature for extended periods, as it will melt the butter prematurely and irreparably compromise the pastry’s delicate structure.
- Chill is Your Friend – The Colder the Better for Flakiness! After you’ve skillfully assembled and braided your beautiful cheese danish, resist the immediate urge to pop it straight into a hot oven. A crucial, often overlooked, step for achieving those magnificent, towering, and ethereal layers is to chill the pastry again. A quick 10-15 minute stint in the fridge (or even covering and refrigerating overnight for maximum benefit) firms up the butter within the puff pastry. When this perfectly cold butter encounters the high heat of the oven, it rapidly melts and creates expansive steam. This steam then forces the individual layers of dough apart, resulting in that wonderfully airy, crisp, and flaky texture we all adore in a danish. This chilling technique also significantly helps the pastry retain its intricate shape during baking, preventing the delectable filling from oozing out. This principle is similar to what makes homemade biscuits or a truly flaky pie crust so light and tender.
- Master the Art of Glazing (Only After the Danish Has Fully Cooled): The bright, zesty lemon glaze provides the perfect crowning touch, but timing is absolutely everything for a picture-perfect finish. Applying the glaze to a warm danish is a common pitfall that can ruin your hard work. The residual heat from the pastry will instantly melt the glaze, causing it to run off, become absorbed by the pastry, and ultimately create a soggy, unappealing mess. For that beautiful, pristine, slightly hardened lemon drizzle that forms a delicate crust, ensure your danish has fully cooled to room temperature, or at least to a very warm state. This allows the glaze to set properly, providing a delightful textural contrast and a burst of fresh lemon flavor without compromising the pastry’s crispness or making it soggy.
A Reader’s Delight: 5-Star Review
“This recipe was an absolute dream! The danish turned out so perfectly, both in taste and appearance. I even experimented a bit, combining the rich cream cheese filling with some gently warmed strawberry preserves, and the result was divine. Next time, I’m excitedly planning to use some fresh pitted cherries I have saved in the freezer – I can already imagine how wonderfully tart and sweet that will be. Thank you so much for sharing such an incredibly easy, beautiful, and truly delicious recipe. It was a delightful treat for everyone!” -Pam
Your Step-by-Step Guide to Making a Flawless Cheese Danish with Puff Pastry
Let’s embark on this delicious baking journey together. Think of me as your personal baking assistant, guiding you through each stage of creating this magnificent pastry. I’ll share all the nuances, helpful hints, and practical advice to ensure your homemade cheese danish is nothing short of spectacular. Even if you’re new to working with puff pastry, you’ll find these steps straightforward, incredibly rewarding, and an enjoyable path to bakery-quality results right in your own home.
Step One: Crafting the Silky Cream Cheese Filling
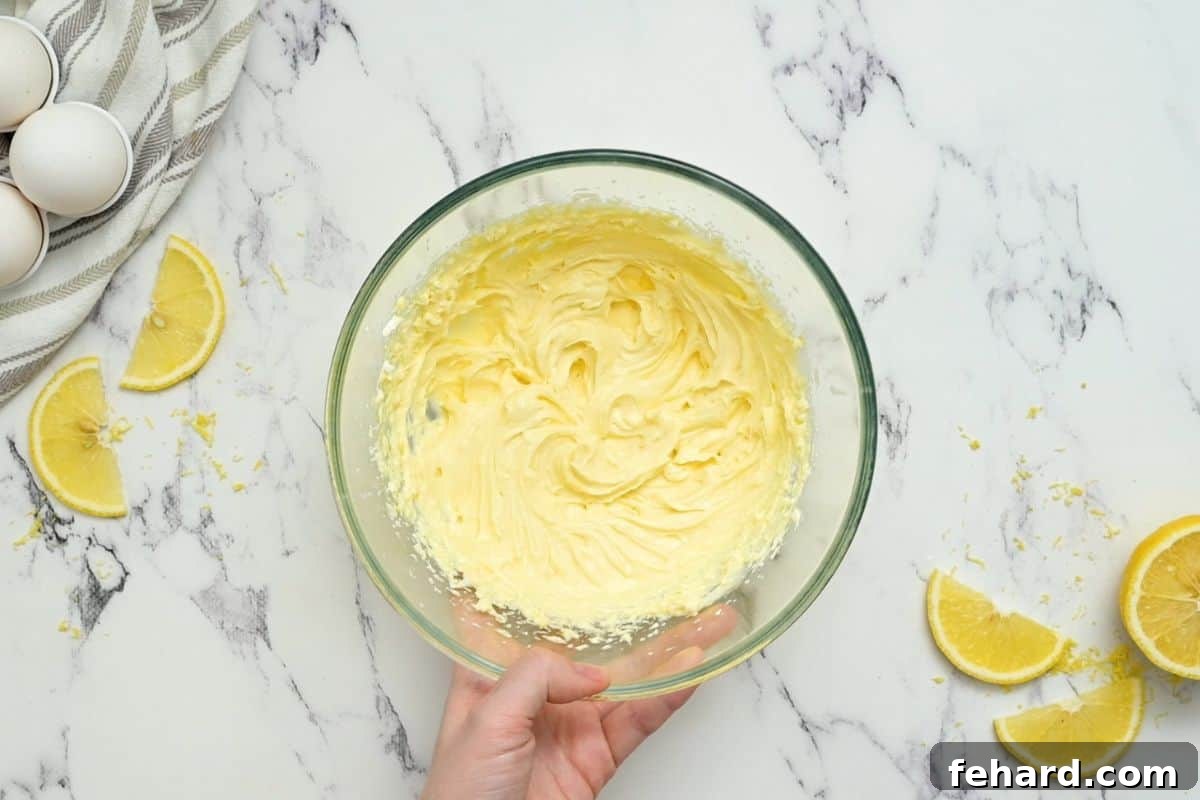
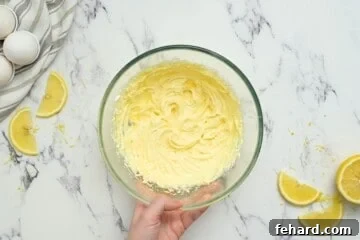
The very heart of our Cheese Danish is its luscious, creamy filling. Achieving the perfect, smooth consistency is absolutely key to a truly delightful bite. In a medium-sized mixing bowl, combine your generously softened, full-fat cream cheese (remember our vital tip about allowing it to reach room temperature!), the precise amount of powdered sugar, a single large egg yolk, a fragrant splash of pure vanilla extract, and the bright, aromatic zest of a lemon. Using a handheld electric mixer, beat these ingredients together on medium speed until the mixture transforms into a luxuriously smooth, uniformly creamy, and utterly lump-free delight. Make sure to scrape down the sides of the bowl occasionally to ensure all ingredients are thoroughly incorporated, leaving no dry pockets. This foundational step is quick but absolutely vital for the ultimate danish experience.
Step Two: Filling and Elegantly Braiding Your Pastry
This is often the step that gives many bakers pause, creating a sense of intimidation. But I assure you, it’s far simpler to execute than it might initially look, and absolute aesthetic perfection isn’t the primary goal – pure deliciousness is! The main objective here is to strategically encase the creamy cheese mixture within the puff pastry so it remains beautifully contained and doesn’t spill out as it bakes and puffs. So, don’t stress too much about a flawlessly symmetrical braid; a rustic, handmade charm is just as inviting and promises an equally tasty outcome.
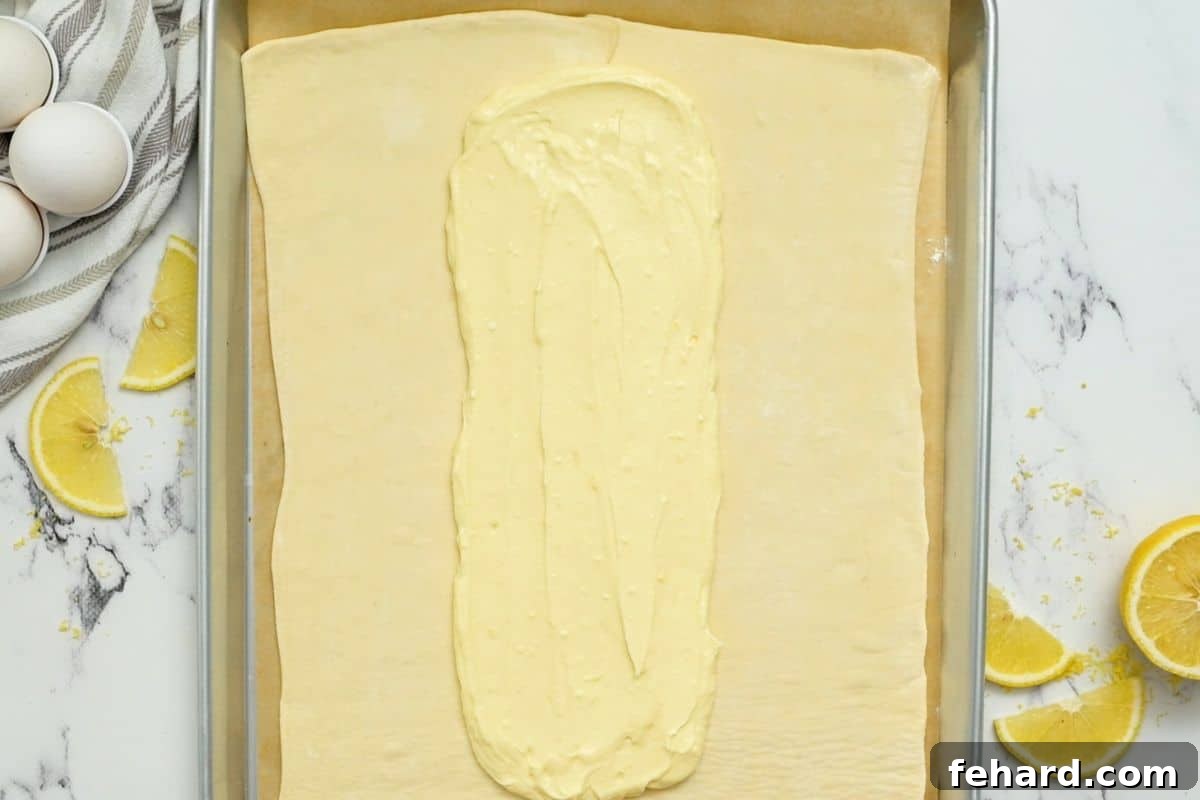
- Prepare Your Pastry Base: Begin by gently unrolling your perfectly thawed puff pastry sheet onto a baking sheet that has been lined with parchment paper. If you’re utilizing two smaller sheets (which is often how frozen puff pastry is packaged), gently press their edges together along one side to seamlessly form a single, larger rectangular sheet. You may then lightly roll the entire pastry with a rolling pin, just enough to smooth out any creases or folds from its packaging, but be careful not to thin it out excessively.
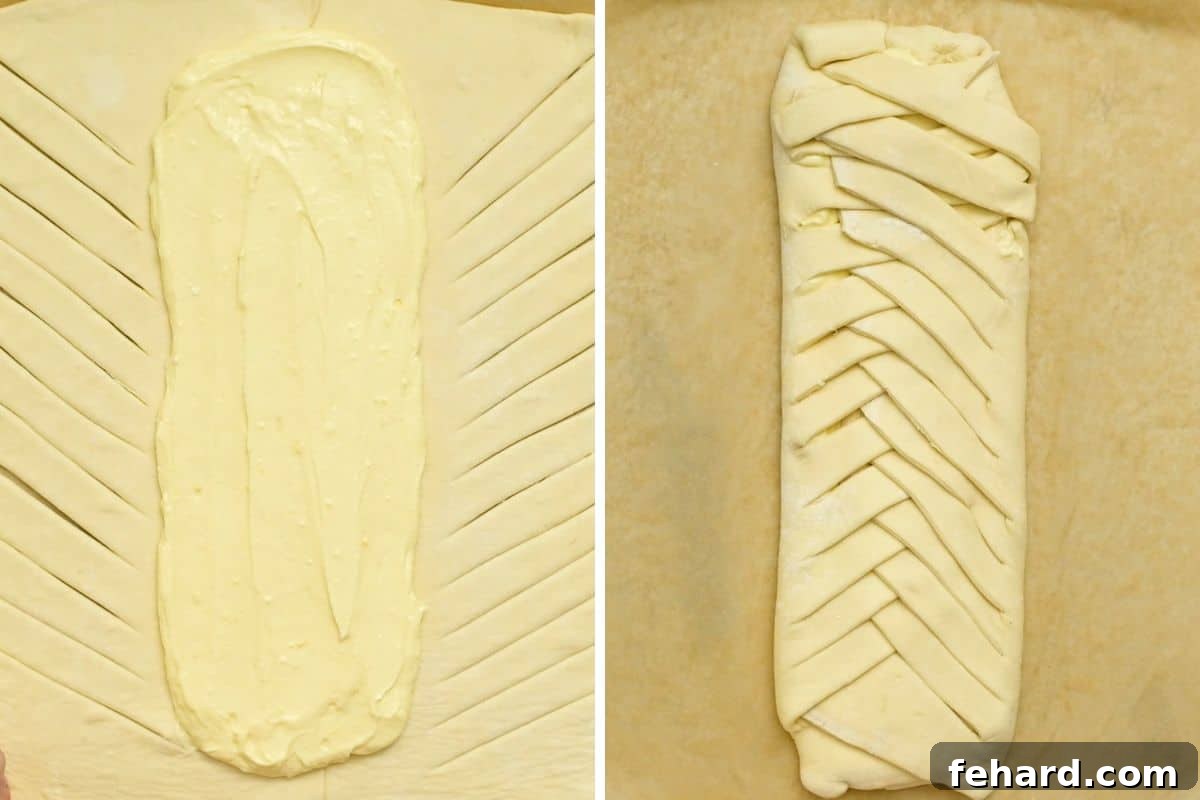
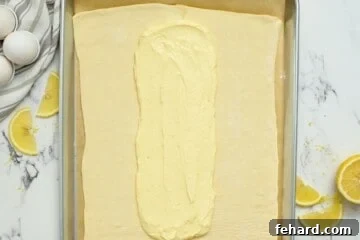
- Dollop and Spread the Filling: With precision, carefully dollop the prepared, silky cream cheese filling down the exact center of the puff pastry. Your aim should be to create a strip of filling that is approximately 2 to 3 inches wide. Crucially, ensure you leave a generous 2-inch border of unadorned pastry clear on both long sides of the filling. This ample border is absolutely essential for creating your “braid” and acts as a barrier, ensuring the filling remains beautifully contained and doesn’t spill out during baking. If you’re incorporating any delicious additional toppings (such as vibrant fruit preserves, fresh berries, or decadent chocolate chips), now is the perfect moment to scatter them evenly and artfully over the cream cheese mixture.
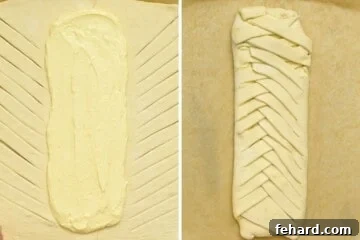
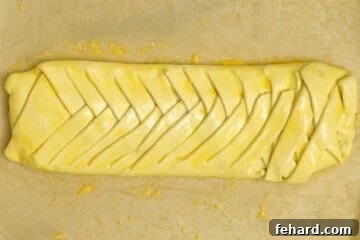
- The Art of the Braid: Now for the signature look! Using a sharp knife or, even better, a pizza wheel (my personal go-to tool for achieving exceptionally clean cuts), make ½-inch thick diagonal strips along each of the 2-inch borders of the dough, cutting all the way from the outer edge directly to the filling. You will now have a series of uniform strips on either side of your filling. Next, take the uppermost strip from one side and gently fold it diagonally over the center filling, pressing lightly to adhere it to the opposite edge of the cream cheese mixture. Then, take the uppermost strip from the other side and fold it over, overlapping the first strip slightly. Continue this alternating pattern, working your way down the entire length of the danish, which will gradually create a beautiful, intertwined braided effect. Remember, it truly doesn’t need to be perfectly symmetrical or geometrically precise; a charming, rustic braid is just as inviting and perfectly guarantees that your delicious filling stays securely put. Finally, neatly tuck any excess dough under the ends of the danish to create a sealed and tidy package.
👉🏻Tool Tip: For effortlessly clean and exceptionally precise cuts in cold puff pastry, I wholeheartedly recommend using a pizza wheel. Its sharp, circular blade glides through the delicate dough much more smoothly and cleanly than a traditional knife, preventing any dragging or tearing and thus preserving the puff pastry’s delicate layers, which are essential for maximum flakiness.
Step Three: The Essential Chill for Flaky Perfection
This step, though incredibly simple, is one of the most important for achieving the coveted light, airy, and spectacularly flaky texture of your finished danish. Once your danish is fully assembled, meticulously braided, and resting on its parchment-lined baking sheet, transfer the entire tray to the refrigerator. Allow it to chill for a minimum of 15-20 minutes while your oven preheats to the specified temperature. This crucial chilling period serves to firm up the butter particles that are layered within the puff pastry dough. This principle is identical to what makes perfect homemade biscuits or a truly flaky pie crust so wonderfully tender. When this very cold butter then encounters the high heat of the oven, it rapidly melts and instantly creates powerful steam. This steam, in turn, forcibly lifts and separates the myriad layers of dough, resulting in that wonderfully airy, crisp, and incredibly flaky texture that you expect from a premium, artisan pastry. Do not, under any circumstances, skip this vital step if you desire maximum flakiness!
Step Four: The Golden Touch – Applying the Egg Wash for a Professional Finish
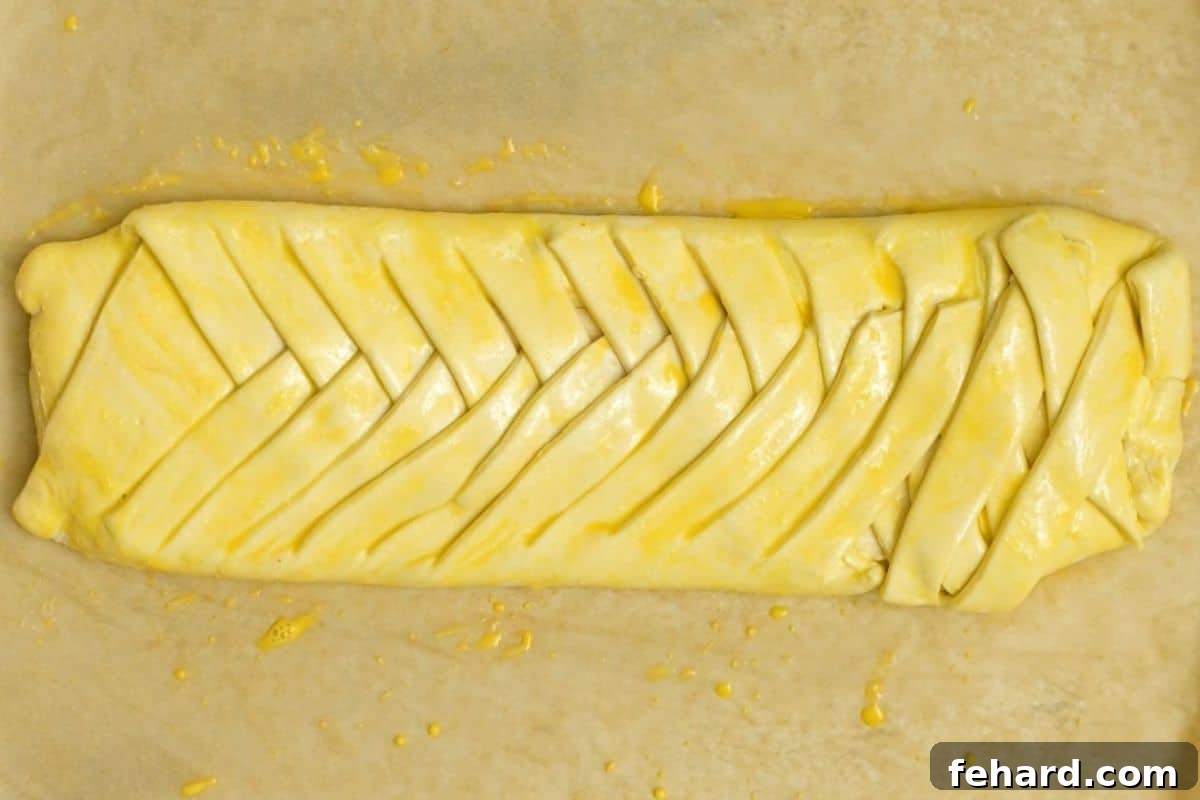
To bestow upon your danish that utterly irresistible, deep golden-brown hue and a beautiful, glossy sheen that makes it look as though it just arrived from a high-end European bakery, we will apply a simple yet highly effective egg wash. In a small bowl, whisk together one large egg with approximately one tablespoon of water until the mixture is thoroughly combined and slightly frothy. Using a clean pastry brush, gently and evenly brush this mixture over all the exposed puff pastry surfaces of your chilled danish. Exercise care to avoid letting the egg wash pool in any crevices or around the base, as this can inhibit the pastry from rising uniformly and create uneven browning. This thin, glossy coating not only enhances the danish’s visual appeal by adding incredible color but also contributes to the development of a beautifully crisp crust.
Step Five: Baking to Golden, Flaky Perfection
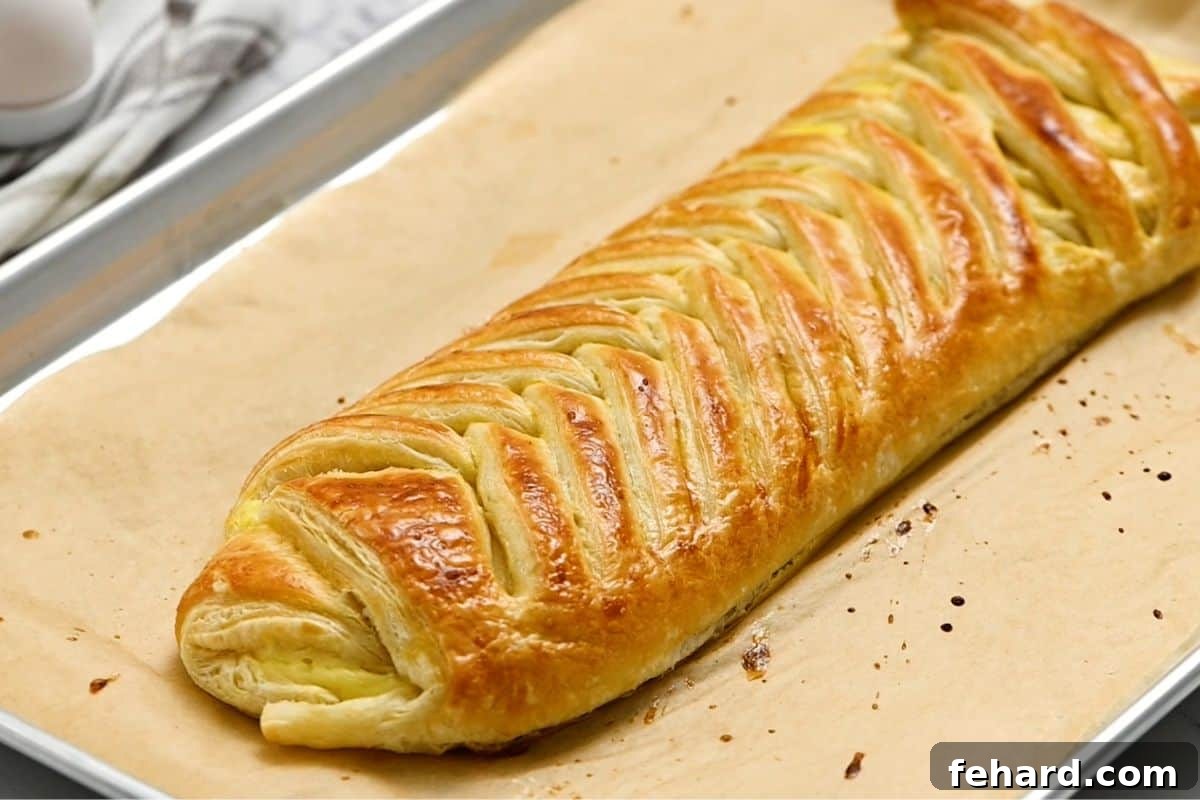
With your oven now perfectly preheated to 400°F (200°C), carefully and gently transfer the chilled, egg-washed danish to the hot oven. Bake for approximately 22-25 minutes. It is crucial to keep a close eye on your danish, especially during the final 5-10 minutes of the baking time, as ovens can vary. You’re looking for a magnificent transformation: the puff pastry should rise dramatically, expanding into beautiful layers and turning a rich, deep golden-brown color across its surface. The entire danish should appear beautifully flaky and thoroughly cooked through. The creamy cheese filling should be visibly set, slightly puffed, and perhaps even lightly golden around the edges. If you observe any particular spots browning too quickly, you can loosely tent the danish with a piece of aluminum foil to prevent over-browning. Once perfectly baked, carefully remove the danish from the oven and immediately transfer it (still on its parchment paper) to a wire cooling rack. This critical step allows air to circulate freely around the bottom of the pastry, preventing any potential sogginess and ensuring a perfectly crisp base. Allow it to cool for at least 10-15 minutes before proceeding to the final, delectable step.
Step Six: The Irresistible Lemon Glaze Finish
The bright, tangy, and subtly sweet lemon glaze is the true crowning glory of this Cheese Danish, adding a final, essential layer of flavor, a delightful textural contrast, and a refreshing citrus kick. While your freshly baked danish is cooling on the wire rack (remembering our golden rule about temperature!), it’s the perfect time to prepare this simple yet impactful glaze. Ensure the danish is sufficiently cooled before glazing to prevent the glaze from melting and becoming absorbed into the pastry.
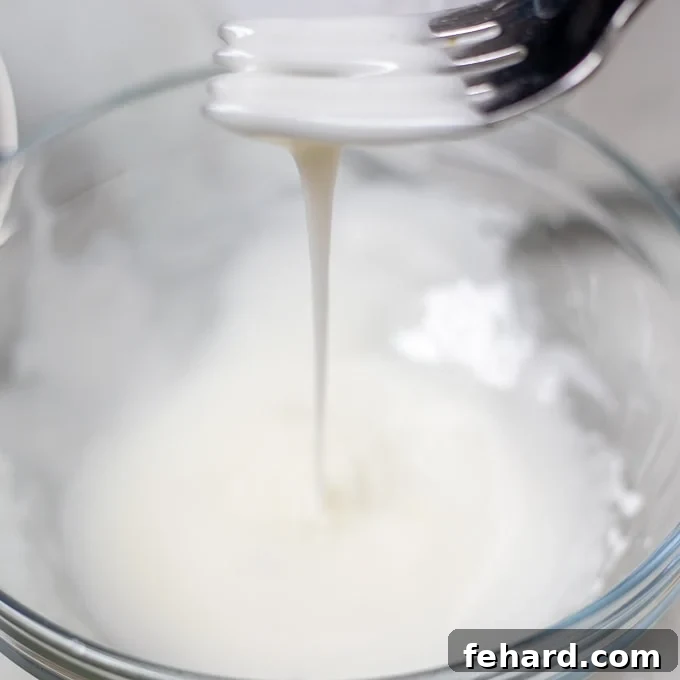
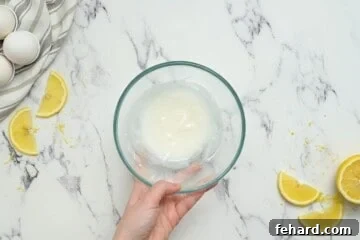
- Mix the Glaze to Perfection: In a small mixing bowl, vigorously whisk together one cup of sifted powdered sugar with precisely two tablespoons of fresh lemon juice. Continue whisking until the mixture is completely smooth, free of any lumps, and achieves a beautifully uniform consistency. You are aiming for a consistency that is thin enough to drizzle elegantly and fluidly over the pastry, but critically, not so thin that it becomes watery and runs off immediately. It should exhibit a slow, continuous ribbon-like fall when lifted from the bowl with a fork or whisk. If your glaze appears too thick, incorporate an additional ½ teaspoon of lemon juice at a time until the desired flow is achieved; conversely, if it appears too thin, gradually add a tablespoon more powdered sugar until the perfect consistency is reached.
- Drizzle and Allow to Set: Once the danish has cooled sufficiently to at least warm (preferably reaching room temperature) and your lemon glaze boasts the perfect consistency, generously drizzle the glaze evenly and artfully over the entire baked pastry. You can achieve this with a simple fork, a small spoon for broader strokes, or for more controlled, delicate lines, a piping bag fitted with a very small opening.
- Serve and Savor: Allow the glazed danish to sit undisturbed for a few minutes (typically between 5 and 10 minutes, depending on humidity) to give the glaze ample time to slightly harden and set. This crucial setting period creates a beautiful, non-sticky finish and adds another layer of delightful texture. Once the glaze has set, slice your magnificent homemade Cheese Danish into generous portions and prepare to impress everyone at your table. Every single bite will be a harmonious symphony of flaky pastry, rich and creamy filling, and a zesty, sweet, irresistible finish.
Exciting Flavor Variations to Elevate Your Cheese Danish Experience
While the classic Lemon Cheese Danish is undeniably a masterpiece of flavor and texture, its inherent versatility allows for endless creative adaptations. You can effortlessly customize this recipe by introducing your favorite fruit, a touch of chocolate, or even different citrus notes directly into the cream cheese mixture before baking. These simple yet impactful additions can transform your danish into a completely new and exciting treat, perfectly tailored for any preference, season, or occasion. Here are some truly delicious ideas to ignite your culinary imagination and inspire your next baking adventure:
- Decadent Chocolate Chip Danish: For all the devoted chocolate lovers, this variation is a must-try. Generously sprinkle a ¼ to ½ cup of miniature chocolate chips or roughly chopped quality chocolate chunks directly on top of the cream cheese filling just before you begin to braid the pastry. As the danish bakes to golden perfection, the chocolate will melt slightly, creating delightful pockets of gooey, rich chocolate that beautifully complement the creamy cheese. Dark, milk, or even white chocolate chips all work wonderfully here, so choose your favorite!
- Bursting Blueberry Danish: Embrace the sweet-tart goodness of fresh blueberries! Top the cream cheese mixture with a vibrant ½ cup of fresh blueberries. For a more intense and jammy flavor profile, you could opt for a generous dollop of high-quality blueberry jam or a prepared blueberry pie filling instead. The blueberries will gently warm and burst, creating a delightful and juicy fruity layer nestled within the danish.
- Sweet Raspberry Danish: Create a truly vibrant and elegant Raspberry Danish by spreading ½ cup of your favorite raspberry preserves or seedless raspberry jam evenly over the cream cheese filling before baking. The bright, tangy flavor of raspberries pairs exquisitely and harmoniously with the rich, creamy cheese. Important Note: While fresh raspberries are undeniably delicious on their own, their inherently high water content can potentially make the pastry soggy during baking, which we want to avoid. Therefore, for this specific recipe application, quality preserves or jam are highly recommended for the best textural outcome.
- Classic Strawberry Danish: A timeless and universally beloved combination! Artfully dollop ½ cup of luscious strawberry jam or perfectly sweet strawberry preserves on top of the cream cheese mixture. The comforting and familiar sweetness of strawberry jam creates a wonderfully nostalgic and beloved flavor profile that’s always a crowd-pleaser. Similar to raspberries, fresh strawberries tend to release too much moisture when baked, so sticking to a good quality jam or preserves is the key for maintaining a crisp pastry base.
- Rich Cherry Danish: For a delightful pop of vivid color and deep, sweet flavor, spoon a generous ⅓ cup of premium cherry pie filling over the cream cheese before you begin the braiding process. The sweet and slightly tart cherries provide a classic danish experience that’s always a sophisticated and comforting treat for any occasion.
- Subtle Vanilla Danish (Omit the Lemon): If the bright, zesty flavor of lemon isn’t your preferred taste, adapting this recipe is wonderfully easy! Simply omit the lemon zest entirely from the cream cheese filling. For the finishing glaze, replace the lemon juice with milk (whole milk, skim milk, or even a preferred dairy-free alternative works perfectly), adding it cautiously, teaspoon by teaspoon, until you achieve a smooth, perfectly drizzly consistency. This thoughtful adaptation creates a lovely, mild, and elegantly vanilla-flavored danish that is equally delicious and satisfying.
Prep-Ahead and Storage Tips for Your Convenient Homemade Danish
One of the most appealing aspects of this Easy Cheese Danish recipe is its incredible flexibility for make-ahead preparation, which brilliantly allows you to enjoy fresh-baked goodness even on your busiest mornings or for spontaneous entertaining. Additionally, understanding proper storage techniques ensures any delightful leftovers remain as enjoyable as possible.
- Brilliant Prep-Ahead Instructions for Freezing: To maximize convenience and save valuable time, you can assemble the entire danish right up to the critical point of brushing it with the egg wash. Once meticulously assembled, carefully place the unbaked danish on a baking tray (still lined with parchment paper) and freeze it, uncovered, for several hours until it is completely solid and firm to the touch. Once thoroughly frozen, carefully wrap the danish tightly in multiple layers of plastic wrap, ensuring no air pockets, then transfer it to a freezer-safe bag or an airtight container. It can be safely stored this way in the freezer for up to an impressive 3 months. When you’re ready to indulge, simply remove the plastic wrap, place the frozen pastry directly onto a parchment-lined baking sheet, brush it generously with the prepared egg wash, and bake directly from its frozen state. You will need to increase the baking time to approximately 25-30 minutes at 400°F (200°C), or until it achieves that beautifully puffed, golden-brown perfection. Then, proceed to glaze as usual once the danish has cooled.
- Smart Storage of Leftovers: While the absolute peak of flaky perfection and fresh taste is undeniably achieved when this Cheese Danish is enjoyed freshly baked on the very day it’s made, any leftovers are still incredibly delicious and worth savoring! Store any remaining slices in an airtight container in the refrigerator for up to 3-4 days. To revive its tender flakiness and warm, creamy center, we recommend gently warming individual slices. You can do this briefly in the microwave for 15-30 seconds, or for a crispier exterior, gently heat it in a toaster oven or a conventional oven at a low temperature until it is just heated through. Be cautious to avoid overheating, which can quickly dry out the delicate pastry.
More Delightful Brunch Recipes to Complete Your Feast
Whether this buttery, flaky, sweet, and incredibly creamy Cream Cheese Danish takes center stage at a festive holiday brunch or serves as an easy, yet elegant, weekend treat, it’s absolutely sure to be a beloved crowd-pleaser. Enhance your brunch spread and create a truly memorable meal that everyone will adore by pairing it with one or more of these thoughtfully selected, complementary dishes. These recipes offer a fantastic balance of both sweet and savory options, ensuring a perfectly rounded and satisfying brunch menu for any occasion.
- Easy Hashbrown Breakfast Casserole: A savory, incredibly hearty casserole featuring crispy golden hashbrowns, fluffy eggs, melted cheese, and your choice of delicious breakfast meats. It’s truly perfect for effortlessly feeding a crowd and boasts the added convenience of often being prepped ahead of time.
- Green Chile Egg Casserole: A uniquely flavorful and subtly spicy egg casserole, wonderfully elevated with the distinct, earthy taste of green chiles. This provides a fantastic, unexpected kick and makes for a truly unique and memorable brunch centerpiece.
- Asparagus Frittata: A light, incredibly elegant, and wonderfully vegetable-packed frittata that’s effortlessly impressive. It’s absolutely ideal for springtime brunches, offering a fresh, vibrant, and healthy option to balance richer dishes.
- Overnight Breakfast Strata: The ultimate convenient make-ahead dish that combines layers of bread, eggs, cheese, and often savory sausage or fresh vegetables. Simply assemble it the night before and then bake it in the morning for a completely stress-free and delicious start to your day.
- Fruit Salad with Honey Lime Dressing: A wonderfully refreshing and vibrantly colorful medley of the season’s best fruits, exquisitely brightened with a zesty and sweet honey-lime dressing. This adds a crucial fresh, light, and cleansing element to beautifully balance the richness of other brunch items.
- Crockpot Breakfast Casserole: The ultimate hands-off breakfast solution for effortless entertaining! Simply prepare your ingredients, layer them beautifully in a slow cooker, and wake up to a warm, ready-to-serve, and utterly delicious breakfast. This ingenious method frees up your oven entirely for baking other delightful dishes, such as this glorious danish.
Easy Cheese Danish
Servings: 8
Prep: 10 mins
Cook: 20 mins
Total: 30 mins

From the flaky pastry to the creamy filling and bright lemon glaze, this Cheese Danish is impressively delicious with minimal prep, thanks to starting with store-bought puff pastry. It’s perfect for holiday brunches or a delightful weekend treat.
Ingredients
- For the Danish:
- 1 (13-17 ounce package) puff pastry, thawed if frozen
- 8 ounces cream cheese, softened (full-fat recommended for best texture)
- 1 large egg yolk, for filling
- ½ teaspoon vanilla extract
- 1 teaspoon fresh lemon juice
- ½ teaspoon lemon zest
- ¼ cup powdered sugar, sifted
- 1 large egg, for egg wash
- 1 tablespoon water, for egg wash
- For the Lemon Glaze:
- 1 cup powdered sugar, sifted
- 2 tablespoons fresh lemon juice, plus more if needed for consistency
Instructions
-
In a large mixing bowl, combine 8 ounces softened cream cheese, 1 large egg yolk, ½ teaspoon vanilla extract, 1 teaspoon fresh lemon juice, ½ teaspoon lemon zest, and ¼ cup sifted powdered sugar. Beat with a handheld mixer on medium speed until the mixture is completely smooth and creamy, with no lumps remaining.

-
Unroll the puff pastry onto a baking sheet lined with parchment paper. If using two smaller sheets, gently press them together to form one larger sheet. Lightly roll the puff pastry to smooth out creases. Spread the cream cheese filling down the center of the puff pastry, creating a 2 to 3-inch wide section. Ensure you leave a 2-inch border of pastry clear on both long sides. If adding any additional toppings (like fruit or chocolate chips), place them on top of the cream cheese mixture now.
-
Using a sharp knife or a pizza wheel, cut ½-inch diagonal strips up each side of the dough, extending from the outer edge to the filling. Fold these strips over the filling, alternating sides to create a beautiful braided pattern. Gently tuck any excess dough under the ends to seal the danish. Place the baking tray with the assembled danish into the refrigerator to chill for 15-20 minutes while your oven preheats.
-
Preheat your oven to 400°F (200°C).
-
Once the oven is preheated, whisk together 1 large egg with 1 tablespoon of water to create an egg wash. Remove the chilled pastry from the refrigerator and brush the exposed puff pastry generously and evenly with the egg wash. This will ensure a beautiful golden crust.
-
Bake for 22-25 minutes, or until the danish is beautifully golden brown, puffed, and flaky. Remove it from the oven and transfer it (still on the parchment paper) to a wire rack to cool for at least 10-15 minutes before glazing.
-
For the lemon glaze, whisk together 1 cup sifted powdered sugar with 2 tablespoons fresh lemon juice in a small bowl until smooth. Adjust consistency by adding more powdered sugar (for thicker) or lemon juice (for thinner) as needed, aiming for a slow, ribbon-like drizzle that falls off a fork.
-
Once the Cheese Danish has cooled sufficiently, drizzle the prepared lemon glaze evenly over the top. Allow the glaze to set for 5-10 minutes before slicing and serving. Enjoy your irresistible homemade pastry!


Equipment
- Parchment Paper
- Handheld Mixer
- Baking Sheet
- Mixing Bowls
- Pastry Brush
- Pizza Wheel (optional, but recommended for clean cuts)
Notes
Puff Pastry: Frozen puff pastry often comes in 17-ounce packages with two sheets. Refrigerated puff pastry typically comes as one 13-ounce sheet. If you are using two smaller sheets, gently press their edges together along one side to form a single larger sheet before rolling. Always ensure the puff pastry is fully thawed in the refrigerator before use for the best results.
Storage: This Cheese Danish is truly at its absolute best when enjoyed fresh on the very day it’s baked. However, any delicious leftovers can be stored in an airtight container in the refrigerator for up to 3-4 days. For optimal enjoyment, gently warm individual slices briefly in the microwave for 15-30 seconds, or in a toaster oven until just heated through, to restore a touch of its fresh-baked texture.
Prepare in Advance (Freezing): For ultimate convenience, you can prepare the danish right up to the point of applying the egg wash. Flash freeze the unbaked danish on a tray until it’s completely solid (this usually takes several hours). Once thoroughly frozen, carefully wrap the danish tightly in plastic wrap to prevent freezer burn, then transfer it to a freezer-safe bag or an airtight container. It will keep well for up to 3 months. When you’re ready to bake, remove the plastic wrap, place the frozen pastry directly on a parchment-lined baking sheet, and brush generously with egg wash. Bake directly from frozen at 400°F (200°C) for 25-30 minutes, or until beautifully golden brown and puffed. Glaze as instructed once cooled.
Nutrition
Nutrition information is automatically calculated and should be used as an approximation. Actual values may vary based on specific ingredients and preparation methods.
- Calories: 272 kcal
- Carbohydrates: 35 g
- Protein: 6 g
- Fat: 16 g
- Saturated Fat: 5 g
- Cholesterol: 60 mg
- Sodium: 219 mg
- Potassium: 101 mg
- Fiber: 1 g
- Sugar: 20 g
- Vitamin A: 219 IU
- Vitamin C: 2 mg
- Calcium: 51 mg
- Iron: 1 mg
This post was originally published in 2019 and has been comprehensively updated in 2025 to include enhanced expert tips, new inspiring photographs, and detailed, easy-to-follow instructions for an even better baking experience and superior results.