

The Ultimate Cream Cheese Sugar Cookie Icing: Easy, Delicious & Perfectly Hardening
Are you tirelessly searching for that elusive sugar cookie icing recipe that not only tastes incredible but is also remarkably easy to prepare and hardens flawlessly? Your quest ends here! This extraordinary cream cheese frosting is a true game-changer, satisfying all these criteria and more. It masterfully blends the rich, tangy essence of cream cheese with an impossibly silky-smooth texture, making it a pure joy to spread evenly and ensuring it holds its decorative shape with impressive stability. Forget crumbly, overly sweet, or runny icings; this recipe delivers perfection every time, transforming your homemade sugar cookies into edible works of art.
While this recipe stands as my undisputed favorite for decorating classic cut-out sugar cookies, its exceptional versatility extends far beyond. I frequently turn to this luscious cream cheese frosting to elevate a diverse array of sweet treats, from moist muffins and elegant layer cakes to wholesome quick breads. The inherent tanginess from the premium cream cheese is the secret to its balanced profile, cutting through the sweetness to create a complex, rich, and creamy icing that is simply irresistible. This delicate balance ensures that your baked goods are enhanced, not overwhelmed, making every bite a delightful experience.

Expert Tips for Achieving Perfect Cream Cheese Sugar Cookie Icing

Crafting the absolute best cream cheese icing, one that’s ideal for both elegantly frosting cookies and enhancing numerous other desserts, hinges on observing a few critical guidelines. These insights, refined over years of dedicated baking and decorating, will guarantee your frosting is consistently smooth, exquisitely flavorful, and possesses just the right texture to make your culinary creations shine. Mastering these key pointers will set your sugar cookie icing apart, ensuring it’s a memorable addition to any treat.
- Embrace Room Temperature Ingredients: For a flawlessly smooth, lump-free, and effortlessly spreadable icing, it is paramount that both your unsalted butter and full-fat cream cheese are brought to proper room temperature. Cold ingredients resist emulsification, leading to a lumpy, frustratingly stiff frosting. To ensure success, plan ahead and remove these dairy items from your refrigerator at least 60 to 90 minutes before you intend to begin mixing. This small step is foundational for the creamy texture you desire.
- Full-Fat Cream Cheese is Non-Negotiable: When it comes to the integrity and richness of this cream cheese icing, opting for full-fat cream cheese isn’t merely a suggestion – it’s an absolute necessity. Lower-fat or fat-free alternatives contain a significantly higher water content and less fat, which can disastrously alter the frosting’s consistency, leading to a thin, watery, or separated mixture that lacks the desired luxurious creaminess and stability. Always choose the highest quality, full-fat block cream cheese for optimal results.
- No Advanced Piping Skills or Tools Needed: Do not be intimidated by the thought of intricate cookie decorating! While this robust icing is perfectly capable of being piped through professional bags and decorative tips, its naturally smooth and forgiving consistency means you can achieve beautiful results with minimal effort. Simply use a humble butter knife, a small offset spatula, or even the back of a spoon to elegantly spread it onto your cooled cookies, cakes, or muffins. It’s a truly beginner-friendly frosting that allows for stunning presentation without the fuss.
- Tailor Your Icing’s Thickness: One of the brilliant features of this recipe is its adaptability to various decorating needs. Whether your preference is a thin, glossy glaze for a quick and simple spread, or a thicker, more structured frosting for intricate piping work, this recipe can be easily customized. I provide clear instructions within the recipe card on how to adjust the consistency: add a little more sifted powdered sugar for a firmer, pipeable icing, or a tiny splash of milk for a thinner, more free-flowing glaze. This flexibility ensures your frosting perfectly matches your creative vision.
- Crucial Step: Ensure Baked Goods are Completely Cooled: This vital instruction is often overlooked, but it is absolutely paramount for successful icing. You must allow your cookies, cakes, cupcakes, or rolls to cool down entirely to room temperature – and ideally beyond, sometimes even chilling them slightly – before even considering applying the frosting. Attempting to frost warm baked goods will inevitably cause the butter and cream cheese in the icing to melt, resulting in a disastrously runny, sliding mess. Patience truly is a virtue in baking; wait for complete cooling to achieve a perfectly set and beautiful finish.
Happy Baking and Decorating! xo Kristen
Crafting Your Creamy Dream: A Step-by-Step Guide to Making Irresistible Sugar Cookie Icing
The following detailed tips are specifically designed to help you achieve flawlessly smooth, perfectly flavored, and beautifully consistent cream cheese icing every single time. For the exact ingredient quantities and comprehensive instructions, please refer to the complete recipe card located at the very bottom of this post. These guidelines provide the nuances that elevate a good frosting to a truly exceptional one.
- Cream Butter and Cream Cheese to Perfection: Begin this delightful process by combining your pre-softened, full-fat cream cheese, soft unsalted butter, aromatic vanilla extract, and a subtle pinch of table salt in a spacious mixing bowl. Utilizing either a powerful stand mixer equipped with a paddle attachment or a reliable handheld mixer, beat these foundational ingredients together on a medium-high speed. Continue mixing until the concoction transforms into a visually appealing, beautifully smooth, light, and wonderfully creamy consistency. It’s crucial to pause periodically and meticulously scrape down the sides and bottom of the bowl with a rubber spatula, ensuring every bit of ingredient is thoroughly incorporated and absolutely no unmixed lumps remain. This initial, meticulous creaming step is fundamental for cultivating the silky-smooth final texture of your frosting.
- Gradually Incorporate Powdered Sugar and Milk for Ideal Consistency: The precise volume of powdered sugar and milk required can subtly fluctuate due to ambient environmental factors, such as humidity levels, as well as your precise desired icing consistency. Initiate this stage by carefully sifting 2 cups of powdered sugar directly over your impeccably creamed mixture. Sifting, though seemingly a minor detail, is a profoundly important step that actively prevents the formation of any unwanted lumps, thereby guaranteeing a truly pristine, smooth frosting. Mix this on a low speed until the powdered sugar is just barely combined with the wet ingredients. Following this, progressively introduce 1 tablespoon of milk, adding one tablespoon at a time, and thoroughly beat on a low to medium speed until your desired consistency is achieved. As you mix, carefully assess the texture:
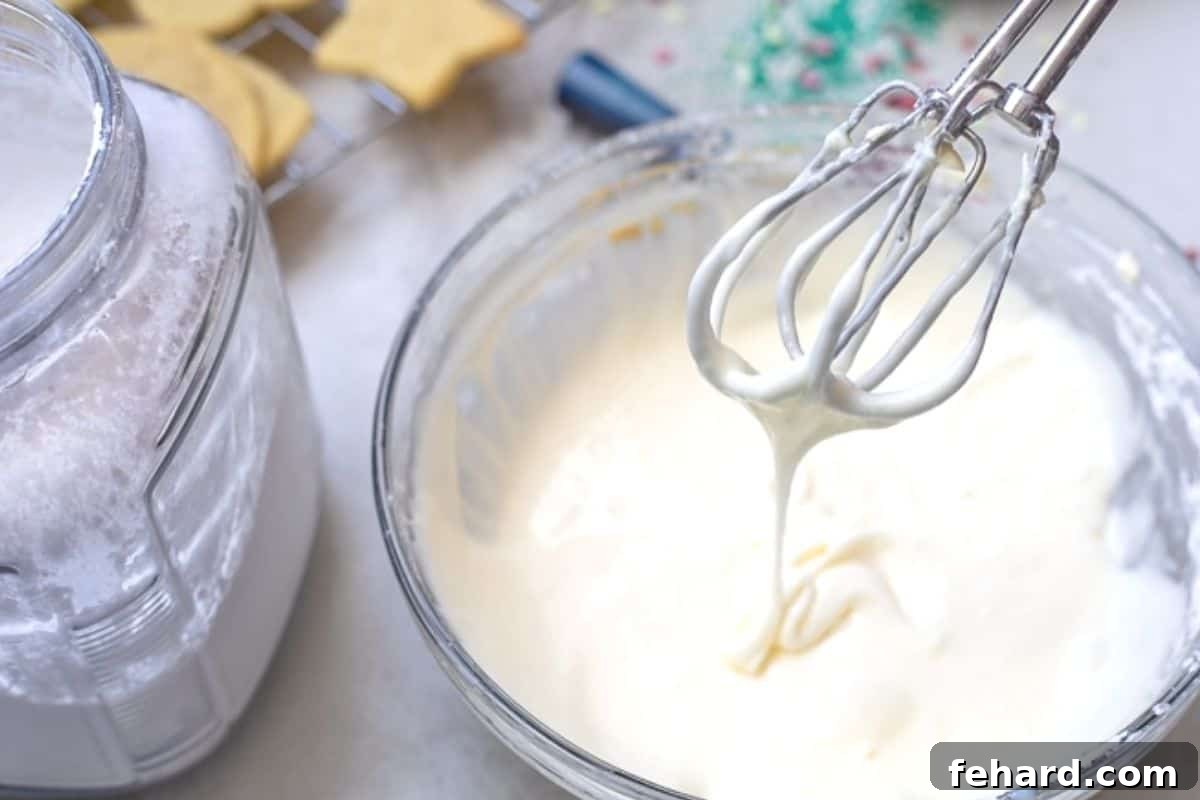
- For a Perfectly Spreadable Icing: If your primary goal is an icing that glides and spreads with effortless grace onto cookies, cakes, or muffins, aim for a consistency where the frosting gracefully drips from your beaters in a thick, luxurious, and unbroken ribbon. This ideal texture is fluid enough to be easily manipulated but possesses sufficient body to maintain its shape once applied. Should it appear too thick, incorporate additional milk, a delicate half-teaspoon at a time. Conversely, if it seems too thin, a slight addition of more sifted powdered sugar will correct it, until this exquisite ribbon-like consistency is perfectly attained.
- For Thicker, Pipeable Icing: For those planning to utilize piping bags to execute more intricate, detailed, or structured decorations, a distinctly firmer icing consistency is required. After achieving the initial spreadable consistency, gradually introduce an additional ¼ to ½ cup of sifted powdered sugar. Beat the mixture thoroughly after each incremental addition, meticulously monitoring the texture until the frosting achieves a robust thickness capable of holding its form precisely when piped. Crucially, even at this increased thickness, the frosting should remain wonderfully smooth and workable, never stiff, dry, or crumbly.
Mastering the Art of Decorating: Effortless Techniques for Icing Sugar Cookies
Decorating sugar cookies, or any cookie you wish to enhance, offers a spectrum of possibilities, from elegantly simple to intricately detailed. This remarkably versatile cream cheese icing guarantees impeccable results, whether you opt for a swift, smooth spread or more elaborate, piped designs. It’s a frosting that adapts to your creative ambitions, making every cookie a canvas.
The Effortless Way: Spreading Icing for Simple Elegance
If time is of the essence or if you simply adore the charm of a rustic, homemade aesthetic, spreading this rich icing is undeniably the quickest and most straightforward method to beautify your cookies. This approach is perfectly suited for casual gatherings, delightful everyday treats, or engaging decorating sessions with children, offering beautiful results with minimal fuss.
- Infuse with Color (Optional): Should you desire to introduce a vibrant palette to your cookies, begin by dividing your meticulously prepared frosting into as many individual bowls as the number of distinct colors you wish to incorporate. Into each bowl, carefully add just a couple of drops of your chosen food dye, then mix thoroughly until the color is uniformly distributed throughout the icing. Continue to add more dye, one drop at a time, until you achieve the precise vibrant or subtle hue you envision.
- Spread with Everyday Tools: There is absolutely no need for specialized or expensive equipment here! Gently dollop a modest spoonful of the creamy icing onto the center of each thoroughly cooled cookie. Then, using an ordinary butter knife, a nimble tiny offset knife, or a small, flexible spatula, carefully and evenly spread the icing across the cookie’s surface. The inherent creamy consistency of this frosting ensures it is incredibly forgiving and wonderfully easy to manipulate, allowing for a smooth and even layer.
- Adorn with Sprinkles for Sparkle: Immediately after applying the icing, while its surface is still delightfully wet and soft, generously sprinkle your favorite decorative toppings over the top. This could include classic sprinkles, shimmering colored sugars, or elegant edible glitter. The fresh, wet frosting will act as a natural adhesive, guaranteeing your decorations adhere beautifully and securely. This swift addition instantly infuses your cookies with festivity and provides a delightful textural contrast.
- Crucial Drying Time for Hardening: Once your cookies are beautifully iced and adorned with their chosen sprinkles, arrange them in a single, unstacked layer on parchment paper or wax paper. Allow them to air dry, uncovered, at room temperature for several hours – typically 4 to 6 hours, or even ideally overnight – until the icing develops a firm, dry-to-the-touch crust. This critical setting period is essential; it prevents any smudging, sticking, or damage to your gorgeous decorations when the cookies are subsequently handled or stored, ensuring they remain pristine.

Elevating Your Designs: For More Detailed Decorations and Intricate Piping
When your creative spirit beckons for more elaborate designs, delicate borders, personalized messages, or intricate patterns on your sugar cookies, this exceptional cream cheese icing rises to the challenge beautifully. For these more precise applications, it’s essential to prepare the frosting with a slightly thicker consistency, which will enable it to hold its shape perfectly and precisely when piped, ensuring your artistry truly stands out.
- Prepare Your Icing for Piping: Firstly, as outlined in “The Effortless Way” section, dye your prepared icing with food coloring to achieve your desired vibrant or subtle palette. Once colored to perfection, carefully transfer the slightly thicker icing into clean piping bags. These bags can be fitted with various decorative tips to create a diverse range of patterns, from fine outlines with a round tip to elegant rosettes with a star tip. If specialized piping bags aren’t available, a sturdy resealable sandwich bag with a small corner delicately snipped off can serve as an excellent substitute for simpler, yet effective, designs.
- Pipe with Precision and Embellish: With your piping bag meticulously prepared, carefully and steadily pipe your desired decorations onto the completely cooled cookies. Whether you are outlining, flood-filling sections, adding intricate dots, or crafting personalized details, the firmer consistency of this frosting will ensure clean, crisp lines and defined shapes that hold their form beautifully. Remember the golden rule: immediately after piping, while the frosting is still soft and slightly tacky, add any desired sprinkles, edible glitter, or other embellishments to ensure they adhere securely to your artistic creation.
- Allow to Set for Lasting Durability: Just as with the spread method, it is absolutely crucial to allow your meticulously decorated cookies to sit undisturbed on parchment paper or wax paper. Provide ample time for them to harden at room temperature for several hours, ideally overnight. This extended drying period is vital to ensure the frosting develops a firm, non-smudging crust. This setting time is paramount for preserving your detailed artistry, preventing any accidental damage during handling, stacking, or storage, and ensuring your beautiful work remains intact.

Preserving Freshness: Essential Tips for Storing Your Iced Sugar Cookies
Proper storage is paramount to maintaining both the exquisite freshness and the structural integrity of your beautifully iced cookies. Irrespective of the decorating method you’ve chosen, always allow the rich cream cheese frosting to fully set and harden at room temperature. This typically requires several hours – ranging from 4 to 6 hours for thinner applications, up to 12-24 hours for very thick icing or in humid conditions – until the surface is completely firm and dry to the touch. It’s important to understand that while this cream cheese frosting develops a stable crust, it will not become rock-hard like traditional royal icing. However, it hardens sufficiently to permit confident stacking without any risk of smudging or damaging your delicate decorations, making them ideal for thoughtful gifting or convenient transportation.
- Refrigeration for Short-Term Freshness: Once your frosting has unequivocally hardened to the touch, you can carefully stack your cookies. Place them in an airtight container to preserve their freshness. To prevent any unwanted transfer of frosting or flavors between layers, meticulously separate each tier of cookies with a sheet of parchment paper or wax paper. These perfectly iced cookies can then be stored in the refrigerator for a delightful period of up to 5-7 days. For the absolute pinnacle of flavor and texture, I highly recommend removing the cookies from the refrigerator approximately an hour before you plan to indulge, allowing them to gently return to a more ambient room temperature.
- Freezing for Extended Enjoyment: To significantly prolong the lifespan of your scrumptious iced cookies, freezing presents an excellent and highly effective option. Begin by arranging your freshly iced and fully hardened cookies in a single, unstacked layer on a clean baking sheet. Place this baking sheet directly into the freezer and allow them to flash freeze for approximately one hour, or until each cookie is frozen solid. This crucial “flash freezing” step is instrumental in preventing the cookies from sticking together when they are subsequently stored. Once solidified, carefully transfer the frozen cookies to a rigid, freezer-safe container. It is strongly advisable to utilize a hard-sided container rather than a flexible freezer bag, as bags offer considerably less protection, and your delicate iced cookies could easily become crushed or broken. Stack the cookies with additional layers of parchment paper or wax paper for enhanced protection. They can be safely stored in the freezer for up to one month. To serve, simply transfer the frozen cookies to the refrigerator to gently defrost for about 12 hours, or alternatively, allow them to thaw at room temperature on your kitchen counter for a few hours before savoring every delicious bite.
Beyond Cookies: Diverse & Delicious Ways to Utilize This Cream Cheese Icing
While this velvety cream cheese frosting is undeniably my steadfast choice for creating perfect cut-out sugar cookies, its delightful tangy flavor and incredibly adaptable consistency elevate it to a star ingredient, making it suitable for a multitude of other delectable treats. Don’t restrict yourself to just cookies; I heartily encourage you to explore the myriad ways this rich and tangy icing can magnificently enhance and transform a wide variety of your most cherished baked goods!
- Elevate Homemade Cinnamon Rolls: Transform your tender, fluffy homemade cinnamon rolls from delightful to truly extraordinary by generously spreading this cream cheese icing over the warm, freshly baked spirals. The exquisite tanginess of the frosting provides a magnificent counterpoint to the sweet cinnamon filling, culminating in an utterly irresistible finish that far surpasses any basic glaze.
- The Ultimate Frosting for Cakes and Cupcakes: This recipe is an unequivocally ideal choice for beautifully frosting an extensive range of cakes and cupcakes. Whether you are baking a deeply moist sour cream banana cake, a comforting spiced pumpkin cake, or any other beloved cake or cupcake flavor you adore, this cream cheese frosting infuses it with a luxurious, creamy texture and a perfectly harmonized sweetness that is guaranteed to captivate everyone’s taste buds.
- Transform Muffins into Decadent Delights: Take your everyday muffins from simple, wholesome snacks to truly special, decadent treats with just a generous dollop of this glorious frosting. It proves particularly exquisite on spiced, fall-inspired flavors such as wholesome carrot cake muffins or hearty pumpkin muffins. A luxurious swirl of this specific icing on a warm pumpkin muffin astonishingly mimics the taste of a classic pumpkin roll – pure yum in every bite!
- Elevate Banana Bread to Dessert Status: Instantly upgrade a humble, wholesome loaf of healthy banana bread by topping it with a lavish layer of this delectable cream cheese frosting. This simple addition effortlessly transitions a breakfast staple into a truly decadent dessert, making it perfect for special occasions or simply a delightful sweet indulgence any time.
- A Festive Touch for Holiday Treats: Unleash your creativity during holiday baking! Lovingly decorate homemade peanut butter eggs with a touch of vibrantly colored cream cheese frosting for a charmingly festive and utterly delicious Easter treat. The smooth texture and rich flavor of the frosting pair wonderfully with the nutty, sweet base of the peanut butter eggs.
From gracefully adorning festive sugar cookies and elegant celebration cakes to transforming everyday muffins and comforting cinnamon rolls, this is, without a doubt, the ONLY cream cheese icing recipe you will ever need. Its exceptional balance of sweet and tangy, coupled with its reliable hardening quality, firmly establishes it as an indispensable staple in any passionate baker’s kitchen. Go ahead, give it a try – you might just find yourself shamelessly licking it straight from the beater, a true testament to its irresistible deliciousness!
Cream Cheese Sugar Cookie Icing
Kristen Chidsey
36 Cookies
10 mins
10 mins

Ingredients
- 4 ounces full-fat cream cheese, softened
- 2 tablespoons unsalted butter, softened
- 1 teaspoon vanilla extract
- ⅛ teaspoon table salt
- 2 cups powdered sugar, + more as needed
- 2 tablespoons milk, + more as needed
Instructions
-
In a large bowl, using a handheld mixer or a stand mixer fitted with a paddle attachment, beat the 4 ounces full-fat cream cheese, 2 tablespoons unsalted butter, 1 teaspoon vanilla extract, and ⅛ teaspoon table salt together on medium-high speed until the mixture is smooth and creamy. Make sure to scrape down the sides of the bowl as needed to ensure all ingredients are well combined.

-
Sift 2 cups powdered sugar over the bowl of creamed ingredients. Mix on low speed until the powdered sugar is just combined. Then, add 2 tablespoons milk, adding one tablespoon at a time, and continue to beat on low to medium speed until your desired consistency is reached. The frosting should be thick but not stiff; it should drip in a thick ribbon from the beaters. At this point, it’s perfect for icing cookies, cakes, or cinnamon rolls.
-
For a thicker frosting suitable for piping, gradually add an additional ¼ cup to ½ cup of powdered sugar, beating well after each addition until the desired pipeable consistency is achieved. A good guideline is that 2 cups of powdered sugar often yields a perfect consistency for spreading on cookies, while 2½ cups is ideal for frosting cakes and cupcakes, offering better structural integrity.
To Ice Cookies
-
If desired, divide and dye the frosting with food coloring. For simple designs, use an offset spatula or knife to spread the icing evenly on cooled cookies. For more precise or detailed decorations, transfer the thicker icing to a piping bag fitted with your chosen tip and carefully pipe designs.
-
Add decorative sprinkles or other embellishments immediately after applying the icing, while it is still wet, to ensure they adhere properly.
-
Arrange iced cookies on parchment or wax paper and allow them to harden at room temperature for 12-24 hours. Once the icing is firm to the touch, stack the cookies in an airtight container, using layers of parchment or wax paper between them to prevent sticking and smudging.
-
Store the iced cookies in the refrigerator for up to 5 days. For longer storage, freeze them for up to 1 month in an airtight, freezer-safe container after they have fully hardened.
Notes for Success
Cream Cheese Selection: For the richest flavor and best texture, always use full-fat cream cheese. Ensure it’s softened to room temperature for a lump-free, creamy consistency.
Sifting Powdered Sugar: To guarantee a smooth, velvety cookie icing free from any gritty texture, it is absolutely crucial to sift your powdered sugar before adding it to the mixture. This simple step makes a big difference.
Choice of Milk: Any variety of milk you have on hand will work perfectly in this recipe, whether it’s whole milk, skim milk, or a non-dairy alternative.
Icing Storage: Prepared cream cheese icing can be stored in an airtight container in the refrigerator for up to 5 days, or in the freezer for up to 1 month. If frozen, thaw it completely in the refrigerator, then re-whip it with a mixer until it regains its smooth and creamy texture before use.
Freezing Iced Cookies: For best results when freezing iced cookies, allow the icing to harden completely at room temperature. Then, place the cookies in a single layer on a baking sheet and flash freeze for one hour, or until solid. Once frozen, transfer them to a rigid, freezer-safe container, separating layers with parchment or wax paper. Avoid storing in bags as cookies can be fragile. Freeze for up to 1 month. To enjoy, thaw the cookies in the refrigerator overnight or at room temperature for a few hours.
Nutrition Information (Approximate)
Carbohydrates: 7g
Protein: 1g
Fat: 1g
Saturated Fat: 1g
Cholesterol: 3mg
Sodium: 23mg
Potassium: 9mg
Sugar: 7g
Vitamin A: 39IU
Calcium: 6mg
Iron: 1mg
Please note: Nutrition information is automatically calculated and should be used as an approximation.
Tried this recipe?
Mention @amindfullmom or tag #amindfullmom!
This delightful recipe was originally published in 2019 and thoughtfully updated in 2024 to bring you the most perfect results and an even more enjoyable baking experience.